TIPS, TRICKS, ODDS, & ENDS
Some topics are not lengthy enough to have their own page. This page is devoted to tips, tricks, odds & ends in the audio world for mixing, mic techniques, workarounds, acoustics, equipment maintenance, recording tips, etc, etc, etc. This page will be added to on a regular basis. We are gonna start out lean, but as time passes, new things will be added, and it'll grow:
Cool & Practicle tips by industry veteran Dave RAT
|
|
|
Mixing Console Signal Flow
One of the first things I learned when studying Audio, was mixing console signal flow. Mixing console signal flow is explained simply: How and where the signal goes (flows) in a mixing console. This is an extremely important topic to cover because when you understand mixing console signal flow, you will start to make connections in your mind, and have a complete mastery of mixing console use. One of the most common compliments I have received throughout my career, is people telling me: "Your mixes are so clean!" This is mostly attributed to gaining knowledge early on about console signal flow. Check out this video:
One of the first things I learned when studying Audio, was mixing console signal flow. Mixing console signal flow is explained simply: How and where the signal goes (flows) in a mixing console. This is an extremely important topic to cover because when you understand mixing console signal flow, you will start to make connections in your mind, and have a complete mastery of mixing console use. One of the most common compliments I have received throughout my career, is people telling me: "Your mixes are so clean!" This is mostly attributed to gaining knowledge early on about console signal flow. Check out this video:
Hopefully this video and our "Demystifying The Mixing Console" page will help you get a firmer grasp of the signal flow, and the proper use of a mixing console.
Isolating Loud Guitar Amplifiers In a Church Setting
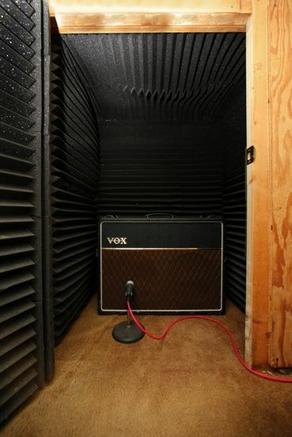
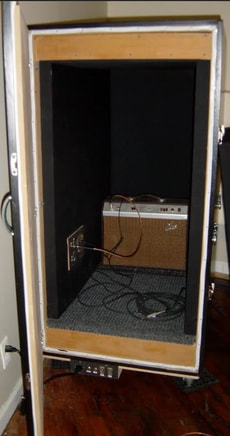
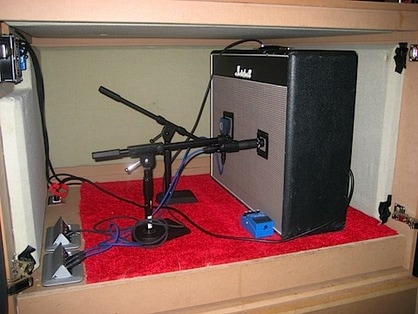
You've been there. To get a decent tone, the guitarist wants to crank his/her amp, but this means a whole lot of stage volume, and a harder mixing scenario. What to do, what to do? The most effective way in dealing with this issue, is to isolate the guitar amplifier to a different area. Most churches will have a back stage area, or some other room near the stage where you can convert it to an amplifier room. From there, you can isolate each guitar amplifier with sound absorption panels, foam, or sound absorption blankets. Most of the time, a box (depending on the size you need) is constructed and treated acoustically. Let's look at some examples of what something like this can look like:
You've been there. To get a decent tone, the guitarist wants to crank his/her amp, but this means a whole lot of stage volume, and a harder mixing scenario. What to do, what to do? The most effective way in dealing with this issue, is to isolate the guitar amplifier to a different area. Most churches will have a back stage area, or some other room near the stage where you can convert it to an amplifier room. From there, you can isolate each guitar amplifier with sound absorption panels, foam, or sound absorption blankets. Most of the time, a box (depending on the size you need) is constructed and treated acoustically. Let's look at some examples of what something like this can look like:
I have been in churches where there was an old bathroom or utility room behind the stage that wasn't being used anymore, and the guitarist placed their guitar amps in that room with the door shut. Some folks will have a separate head on stage where they can control their tone (I personally do this when I play guitar at church), with their cab in an isolated room. From there, you just connect a long speaker cable from your guitar amp head to the isolated cabinet. Note: Make sure that if you are running a tube amplifier, that there is always a speaker cabinet connected to it while it is on, or you can burn up the tubes or the output transformer of the amplifier. Also, whatever way you decide to go with, make sure that your amplifier has plenty of room for heat to dissipate so that the amplifier does not get too hot. If the guitarist has a combo (all in one - where the speaker and amplifier are in one cabinet), you will also need to make sure that you run a buffer or boost from his/her pedal board to the input of the amplifier so that there is no signal loss. Really long instrument cables can have a high capacitance, thus making the guitar tone dull and muffled. Just google "guitar buffer" or "guitar boost" for plenty of options.
Combine Those Toms and Other Items
Drums take a lot of channels on a console. If you have a large enough mixing console, this isn't really an issue, but what happens if you are running out of room? What happens if you have something like multiple toms? Some churches just use an overhead microphone for toms and cymbals, but usually will lose out on the tone of the toms. Now you can have your tom microphones without sacrificing too many channels on your snake and mixing console!
There is a jewel called a microphone combiner that could help.
A Scenario: Let's say you have 4 toms taking up 4 channels on a mixing console. You can reduce them to 2 channels by combining 2 at a time, and also by doing this, you can free up 2 channels on a snake.
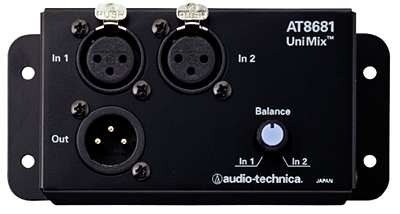
Audio Technica makes a great little combiner like this one:
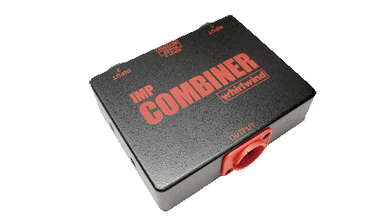
A microphone combiner can also be used on a guitar amplifier that is both mic'd from the front and the back of the cabinet, but you'll have to be diligent to make sure that one of the mic's polarity is switched. If you need a microphone combiner with a polarity switch (as mentioned above), Whirlwind makes a neat unit:
Getting Separation Between a Kick Drum & A Bass Guitar
Sometimes (most of the time), a kick drum and a bass guitar will be all over one another in a mix, and it can be really difficult for you to get a degree of separation between the two where they sound distinct and take up their own space. I have decided to to include some basic tips if (when) you come upon this issue. So, let's dive right in!
1. Cut 400hz in the kick the drum (4db or greater), and then boost 400hz in the bass guitar around the same amount of db as you cut from the kick. Adjust from there.
2. Reverse the polarity of either the kick or bass (whichever sounds better). Meaning - the kick should be one polarity, and the bass should be the other.
3. Add some distortion/overdrive to the bass guitar. A little (most of the time) is all you need. Just enough for a little hair, but more felt than heard. You may have an outboard effects processor that can do this, or you may have to use something like a Sansamp BassDriver. The BassDriver has a built-in overdrive circuit just for this purpose. EBS also makes an overdrive pedal for bass as well.
4. Change mic position of the kick drum. If the bass guitar is more boomy, then go to your kick drum & push your kick drum microphone deeper into the kick nearer the beater head. This will give it more "click," and will mostly give more separation between the two. Really, changing mic positions should be the first thing you do (or at least that's what most engineers will tell you is the textbook thing to do).
5. Sometimes a little boost in the 100hz range on a bass guitar can really help too. This will give the bass guitar more of a "hard" sound that a kick drum will have a harder time reproducing. This is not a rule. This could help or make it worse depending on the instrument.
6. Use compression on both the kick drum and bass guitar. Vary the attack and release times for both within reason. Maybe a slower attack time for the kick than the bass guitar. You'll know it when you hear it. This basically will let the initial transient through without compression and then clamp down, thus fooling the ear to give it more "punch." Start at 20ms. on the attack and adjust from there.
7. Change microphones on the kick drum (if you have another kick drum mic). Most churches will only have one or none at all!
8. Tell the bassist you need more high end from his bass because it is coming across as muddy (if this is the case). A lot of times, a bass guitar can just throw a ton of mud all over the mix. If you tell him/her that you need more treble, they may be more resistant, than if you word it that you need from high end because their bass guitar sounds like mud.
9. Change out the bass guitar for a different one if you have it.
10. Parallel process your bass guitar or kick drum by multing a channel.
11. Use a drum trigger on your kick drum and blend in the triggered sample. A lot of times, this can make a really big difference.
One of these things may be all that you need to do. Stop when you get there and move on to the next problem. Hopefully this list will help you get where you need to go.
Wire It Up Right
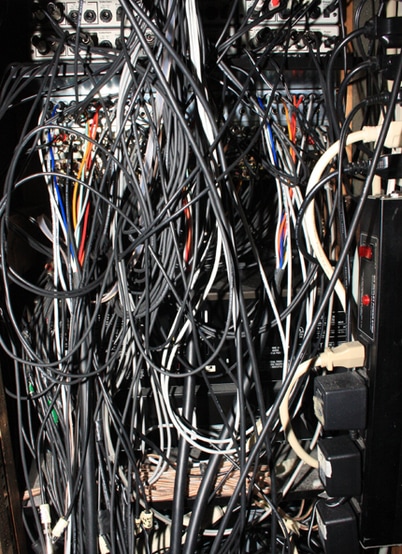
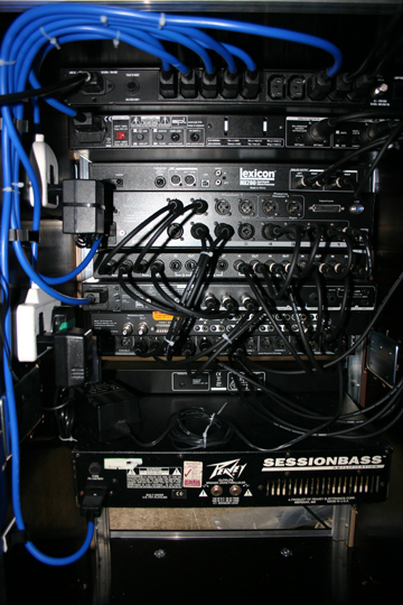
When wiring up a rack or mixing console area, try to keep the power cables and signal cables on opposite sides, or as far away as possible from one another. This can help keep system noise & hum to a minimum, and also forces you to put everything in an orderly fashion. Take the time to do it right, and you'll have minimum issues (if any at all) later!
When wiring up a rack or mixing console area, try to keep the power cables and signal cables on opposite sides, or as far away as possible from one another. This can help keep system noise & hum to a minimum, and also forces you to put everything in an orderly fashion. Take the time to do it right, and you'll have minimum issues (if any at all) later!
Random Tips
1. If you keep having feedback on a channel, try the polarity switch on your mixing console! A lot of times, this will kill feedback instantly!
2. Never run or tie a signal cable parallel to an AC power extension cable. Doing this with lengths over 3 feet can introduce hum and noise in your system.
3. Keep guitar and bass instrument cables under 10 ft. The longer the cable, the more capacitance. This will start dulling the sound of the instrument.
4. Putting reverb on an instrument or voice will push it back in the mix, keeping things drier, will bring them closer. Be conservative in your approach to using reverb.
5. The Shure Beta 87a/c makes a killer lead vocal microphone. Yes, it is more expensive than other typical vocal microphones, but compared to most live vocal microphones out there, it's like removing a thick blanket from off of the original sound.
6. A band will almost always play louder during the actual service/performance than they do during a sound check. This is important to keep in mind when setting up the gain of each channel on a console.
7. Keep extra microphone and 1/4" instrument cables around. I have been in many churches where there were no extra. A cable will go bad at the worst possible time, and then you will be stuck without some extra cables that are ready to go.
8. Sometimes EQ'ing someone's speaking voice can be tough; especially when they are using a headset microphone. Most churches have purchased a cheap headset mic, and it'll sound less than ideal. Getting a good EQ on a headset mic can be tough because after a while, you can lose a reference of what it should sound like...you just know that there is something wrong. Here are 2 things to do to help you out: a. picture in your mind what their voice sounds like in person, and try to replicate that. b. you can use a spectrum analyzer or a spectrum analyzer app. I use "Spectrum Analyze" for android, and it is killer. I find what frequency is peaking, and will cut it a few decibels until it sounds natural. You can repeat this process a few times until you get what you need. Don't go crazy though. Check out our page on equalization for further information!
9. Recording Tip: How about something cool and different? There are times when you are in a recording session, and you don't have access to a piano (like at 3 AM in the morning). If you are recording keyboard with a less than stellar piano sound, and want a more realistic "essence" to the track, try this: Go find an upright piano (it's better if it is in tune) and place something heavy (like the cast iron bottom of mic stand - or a brick..whatever) on the sustain pedal. Run the original piano track through a set of monitors sitting on floor firing into the strings of the upright...this is only achieved by taking out the bottom panel - yes almost all uprights, the bottom wooden panel can be removed... What happens is that as the keyboard track's notes are played back into the strings of a real piano, each corresponding string will sympathetically ring with each note played through the speakers. Then, mic the top of the piano (open the lid) and record these strings moving and ringing and send that to a new track. You may have to adjust and play around with the location of the mic(s) and the original volume of the track being played. Remember, it doesn't have to be loud to be effective. Then, EQ and blend to taste.
10. Recording Tip: Let's say you have been recording a band in which the snare drum sounds terrible. Everyone knows it sounds terrible except for the stubborn drummer who loves the sound of a mallet hitting a tupperware lid. If you were in the digital realm, you could just replace it, or blend in another snare sample, but what if you don't have drum replacement software? This is where "georging" comes into play or in the other part of the world, they call it "arthuring." These are old skool terms, and i'm not even for sure if you could google them...but hey, here's the technique - Send a signal back from your console to an amped speaker. I like a raw framed speaker (about 10") with no cabinet, to accomplish this task, but a studio monitor would suffice as well if that's all ya got. Place that speaker with the snare track solo'd to it firing down; on top of a good snare drum (maybe the one the drummer didn't want to use). Mic the new "georged" snare drum where it sounds the best, and re-record. If there's too much bleed from the other drums on the recording, you can place a gate on the original when re-recording your new snare sound. Adjust to taste. From there you can then blend in your new snare track over the top of the old one, and voila, there's your new and improved snare! Most of the time it's preferable to leave the old snare in the mix, and just mix the other one in.
