THE MAGNIFICENT SUB-BUS
**Disclaimer: Yes I know you probably have a digital console. I am teaching this material from an analog perspective so that there will be a common denominator as to the functionality of audio device controls, their connections, and their general use. Every digital console can be radically different as to which menu/screen a certain function can be located. My goal is to teach these concepts in a very concise and easy to understand manner without being bogged down with each manufacturer's menu preference. "On a Yamaha Rivage, this can be found.... On a Behringer X32, this can be found...."
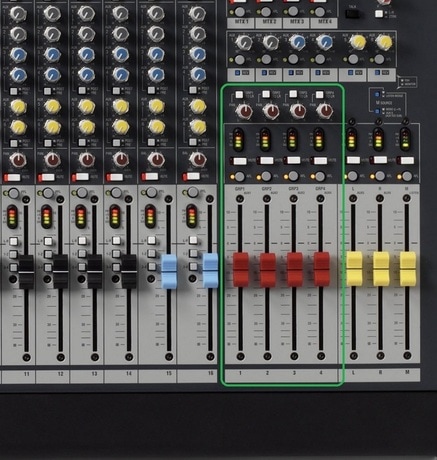
When it comes to the sub bus on a mixing console, confusion abounds. Let’s shed some light on the matter and make sense of it. This is what the sub-bus typically looks like (here, in the master section of this mixing analog console, outlined in green):
Technically speaking, a sub-bus has numerous functions, but the most common one is sub-grouping instruments together to control a whole group of instruments with one or two rather than multiple faders. For example: To turn down multiple microphones on a drum set, you'd have to grab all the faders at one time to turn it down. When you sub-group all of the drum microphones together, all you have to do is pull down one fader and the whole kit comes down. Now, not all mixing consoles have sub-grouping available, but most do.
Sub-Grouping Instruments - Let's Break It Down
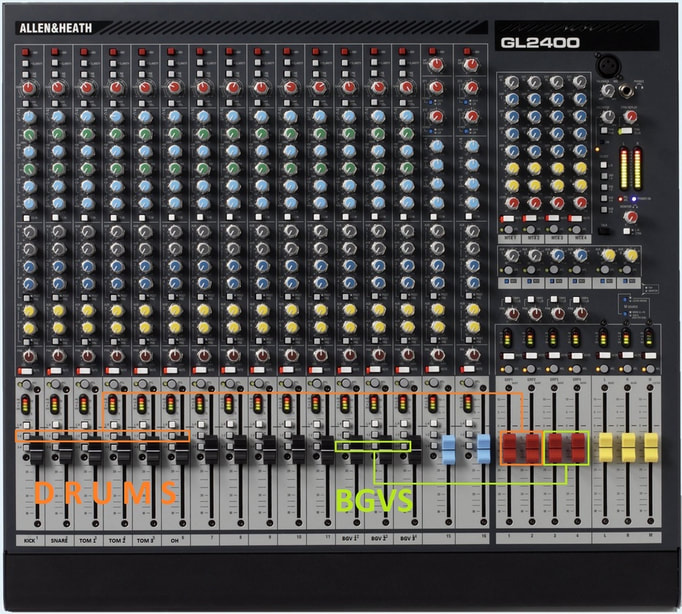
In the picture below, note the small sub-grouping buttons outlined in either green or orange, with a line that runs to the corresponding sub-group fader(s).
Sub-Grouping Instruments - Let's Break It Down
In the picture below, note the small sub-grouping buttons outlined in either green or orange, with a line that runs to the corresponding sub-group fader(s).
In this example, all of the drum microphones are sub-grouped to the sub-group faders 1-2 (shown in the orange rectangles).
It's very easy to do this: simply press the 1-2 buttons down. This sends the signal to the red sub-group faders on the right of the console outlined in orange as well. You still have control of individual faders in the instrument channel group, but you also now have control over the entire drum set with your sub-group faders.
With the background vocals (shown in the green rectangles), the signal is sent to the 3-4 sub-group faders by pressing the 3-4 buttons down on each vocal channel. This routes all of the background vocals to the red 3-4 sub-group faders as shown in the picture above.
Let's Break It Down Even Further
This process gets groups subbed quickly, but for even more functionality, break down the sub-grouping further: Instead of using all 4 sub-group faders for only 2 sub-groups, each fader can be turned into a sub-group.
On this model of mixing console (and many others), the pan knob may have the words "odd" and "even" on each. When pressing the sub-group buttons, the pan knob also functions as a sub-group fader select knob. In other words, if the pan knob is pointed all the way the "odd" position and the 1-2 sub-group button is pressed in, it will route that channel to sub-group fader 1 (an odd number). If the pan knob is rolled all the way to the right to "even," and the 1-2 sub-group button is selected, it will route that channel to the sub-group fader 2 (an even number). It works the same with the sub-group 3-4 button--Odd is 3, Even is 4.
When the sub-group buttons are enabled, the channel's pan knob turns from a left-right stereo pan to an odd-even sub-group fader select knob. If you want panning in a stereo configuration while keeping your sub-grouping, do so in the master section above the sub-group faders.
Note: Not all mixing consoles have the odd/even labels on the sides of the pan knob. For some consoles, this is just an understood function. Other consoles will have a full row of buttons labeled 1 2 3 4 or 1 2 3 4 5 6 7 8, etc.; it is not necessary to select odd or even because the sub-group buttons are separate.
Gluing The Mix Together
When you are mixing and you notice that a group of instruments (like a drum set or background vocals) sound as if they are disjointed, and they lack cohesiveness, you can place a compressor, limiter, or other effect on the sub-buss (sub-group) to "glue" the separate elements together. For instance, you can put all of your vocals in the same aural space by putting a reverb on the sub-group. Compressors and limiters work well, too, like on a drum sub-group. Most mixing consoles have inserts on sub-groups; you would use an insert cable to make the connection. If you are unsure how to accomplish this, you can learn more about it on our Ins & Outs page.
When you are mixing and you notice that a group of instruments (like a drum set or background vocals) sound as if they are disjointed, and they lack cohesiveness, you can place a compressor, limiter, or other effect on the sub-buss (sub-group) to "glue" the separate elements together. For instance, you can put all of your vocals in the same aural space by putting a reverb on the sub-group. Compressors and limiters work well, too, like on a drum sub-group. Most mixing consoles have inserts on sub-groups; you would use an insert cable to make the connection. If you are unsure how to accomplish this, you can learn more about it on our Ins & Outs page.


