EQUALIZATION
In the live sound world, there are two basic types of equalizers.
The first is the Graphic EQ. Here is what it looks like:
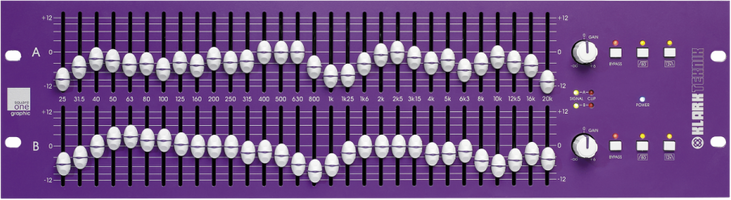
Isn't she purrrdy ???
Each little white "slider" or fader represents a particular frequency (how low or high a sound is, i.e., pitch) in the range of human hearing. These frequency controls are called linear potentiometers (electronic speak). Each fader controls the volume for its respective frequency. If a fader is below the zero mark, you are essentially decreasing the volume level of that frequency (and some around it, too, but we'll get to that later) relative to other frequencies; if the fader is above the zero mark, you are increasing the volume level of that particular frequency. This EQ essentially shows a GRAPHICAL representation of which frequencies are attenuated or boosted in the range of human hearing (20 hertz to 20,000 hertz (20 khz)). The frequencies are arranged low-to-high, with the left third or so in the bass range, the middle in the mid-range, and the right third in the treble range.
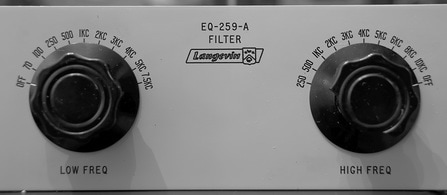
The Second Type of Equalizer is the Parametric EQ:

Typically used for recording, the Tube-Tech EQ 1A is a thing of beauty.
Developed by George Massenburg and Daniel Flickinger, the parametric EQ forever changed the audio world; it is THE most used EQ in audio. The ability to choose the exact frequency and then boost or cut that frequency by an exact amount of decibels makes this type of EQ very powerful.
|
|
 Analog EQ Analog EQ
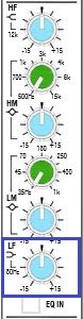
A parametric EQ on a live mixing console is most commonly comprised of 5 sections:
A High Pass Filter (next to the gain/trim knob), The HF section, The HM section, The LM section, and the LF section. • The High Pass filter (so named because it lets the high frequencies pass), filters out any low/sub-harmonic frequency content from a signal. This is very useful for cleaning up an instrument that isn't in the low frequency range, like someone's voice. So whenever you place a high-pass filter on a non-bass instrument, like a vocal, it just filters out the rumble, plosives, and handling noise, without affecting the actual vocal itself. • The rest of the EQ section is located lower on the channel strip and is comprised of 4 other sections grouped together. Each one of these sections has a knob that corresponds to a gain level or frequency in a particular area of the frequency spectrum. |
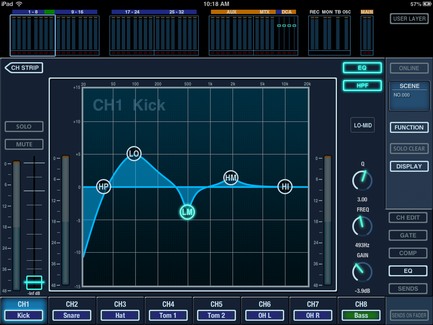
Digital Console EQ has some of the same controls as its analog counterpart.
Now, let's go from the top of an EQ and discuss each control and what they do:
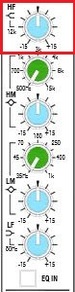 High Frequency
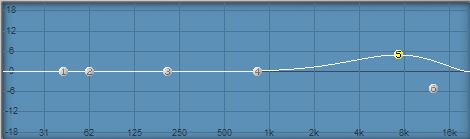
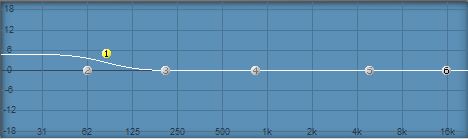
This stands for High Frequency (as represented by the red rectangle). This is the topmost section of the EQ. On this particular channel strip's EQ, this frequency is hard set at 12khz or 12,000hz (same thing). This control is called a High-Shelf. This means that all frequencies from 12khz upward will be controlled by this knob. When you turn the knob past the 12 o'clock position, you are boosting the frequency area of 12khz.
It looks like this on a graph:

Notice the increase on the treble side of the frequency spectrum to the right
When you turn the knob before the 12 o' clock position, you are cutting the volume around that same frequency area. It looks like this
Notice the decrease on the treble side of the frequency spectrum to the right
 High-Mid
HM -
This stands for High Mid-range (as represented by the orange rectangle).
This is part of an actual section of controls (two knobs) just for the High Mid-range frequencies. The first knob lets you select which frequency you'd like to cut or boost with the second knob. The first knob in that section = the frequency; the second knob in that section = volume of that frequency.
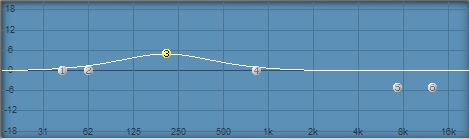
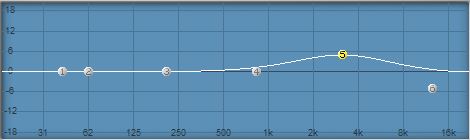
Let's say you want to bring more sizzle to a snare. This typically occurs at 7khz. So, with the first knob of the HM section, select 7khz. Then, using the second knob in the HM section, boost that frequency by turning it past the 12 o'clock position.
That boost will have the resultant effect of this:
This stands for High Mid-range (as represented by the orange rectangle).
This is part of an actual section of controls (two knobs) just for the High Mid-range frequencies. The first knob lets you select which frequency you'd like to cut or boost with the second knob. The first knob in that section = the frequency; the second knob in that section = volume of that frequency.
Let's say you want to bring more sizzle to a snare. This typically occurs at 7khz. So, with the first knob of the HM section, select 7khz. Then, using the second knob in the HM section, boost that frequency by turning it past the 12 o'clock position.
That boost will have the resultant effect of this:
Notice the bottom line of numbers shows frequency. The crest of the boost is happening at 7khz.
If you cut that same frequency, it would look like this:
This shows a decrease (cut) of volume for that same frequency of 7khz
 Low-Mid
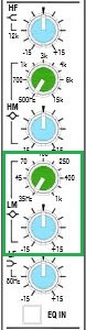
LM - This stands for Low Mid-range (as represented by the green rectangle). This is the third section of controls down from the top. This section allows you to control from 35hz up to 1khz. The first knob lets you select which frequency you'd like to cut or boost with the second knob.
The first knob in the section = the frequency; the second knob = the volume of that frequency.
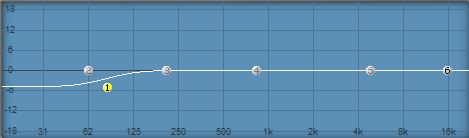
Let’s say you'd like to bring in some warmth in that snare drum we previously mentioned. Take the first knob of the LM section, and adjust it to about 200hz; then bring the second knob of the LM section past the 12 o'clock position to boost that frequency until that snare sounds nice and phat.
That boost will have the resultant effect of this in the frequency spectrum:
The first knob in the section = the frequency; the second knob = the volume of that frequency.
Let’s say you'd like to bring in some warmth in that snare drum we previously mentioned. Take the first knob of the LM section, and adjust it to about 200hz; then bring the second knob of the LM section past the 12 o'clock position to boost that frequency until that snare sounds nice and phat.
That boost will have the resultant effect of this in the frequency spectrum:
This shows a boost of 200hz
And if you wanted to cut that same frequency, it would look like this:
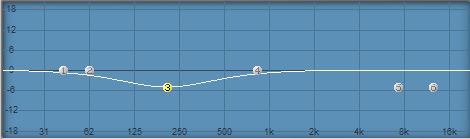
This shows a cut in the 200hz range.
 Low Frequency
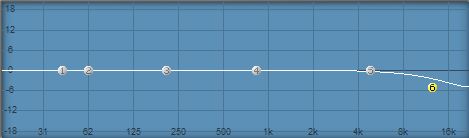
LF - This stands for Low Frequency (as represented by the blue rectangle). This fourth section, at the very bottom of the EQ, controls how much boost or cut in the 80hz range. This type of EQ control is called a Low-Shelf. This means that all of the frequencies from 80hz downward will be affected by the LF control knob.
If you turn the knob past the 12 o'clock position, the result would look like this in the frequency spectrum:
If you turn the knob past the 12 o'clock position, the result would look like this in the frequency spectrum:
The LF section of an EQ is called a Low Shelf EQ. Notice 80hz and below are boosted in this example.
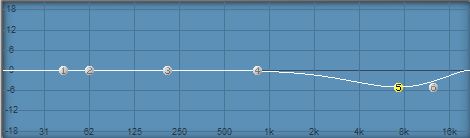
When you turn the knob below the 12 o' clock position, you are cutting the volume around that same frequency area. It looks like this:
The LF section of an EQ is called a Low Shelf EQ. Notice 80hz and below are cut in this example.
bandwidth / q
On upper-end hardware units, software plug-in parametric EQs, & digital mixing consoles, there is also a bandwidth control (also known as Q). Bandwidth (Q) is the ability to control how precise a cut or boost in a particular frequency area is. Notice this picture below:
Wide Bandwidth
Even though 3khz is the frequency you are wanting to affect, the other frequencies in close proximity are affected as well. Bandwidth is the ability to tell a boost or cut how wide or narrow you want it to be. The above picture shows a wide bandwidth while the one below depicts a narrow bandwidth:

Narrow Bandwidth
The two above examples show difference in bandwidth. It would be somewhat rare to have a situation as you see on the lower graphic; it is for visual reference on the difference between the two. In reality, generally speaking, if you boost, do so with a wider bandwidth. If you cut, it is better to do so with a much narrower bandwidth.
General Thoughts & Guidelines in Equalization:
GENERAL THOUGHTS AND GUIDELINES ON EQUALIZATION:
• Typically, it is better to cut than to boost a frequency when EQ'ing; at least engineer folks say that! But our tendency is to boost first. This concept is better understood with a real example. If you have a very strident voice that needs some EQ work...it is better to cut the 4-5khz range rather than to boost the 200hz range. The next time you need to fix a frequency issue, ask yourself if there is a frequency that you could cut instead of boosting another frequency. It is better to cut than to boost because that this is how your ear is most accustomed to hearing sounds, with frequencies being absorbed naturally (because materials in the natural world will absorb a sound).
• When Boosting, use a wider Bandwidth. When Cutting, use a narrower bandwidth. Note: Most analog EQs on the channel strips of affordable medium-format live consoles do not have this option, but if you are on a digital console, or a DAW (Digital Audio Workstation), you do.
• When first starting out, don't boost or cut any frequency more than 6 db. This will keep you from making bad mistakes in the beginning.
• It's always good to start out with the EQ flat and adjust from there.
• Don't EQ just because you can. EQ to make the instrument as natural sounding (or as unnatural, if that’s what you want!) as possible.
• Use a Low-Pass filter to remove hiss and treble from bass instruments only if necessary. A low-pass filter is the opposite of a high-pass filter.
A low-pass filter lets the Low frequencies Pass while cutting the high frequencies out. NOTE: Be careful here. Too much can be a bad thing very quickly. Most of the time it is better not to add a low pass filter unless there is a specific problem you are trying to fix.
• The purpose of Equalization is to fix problems. Most of the time, try to imitate what you'd hear naturally if you were standing in the same room with the instrument without a sound system. The landscape of music is quickly changing. Everything has to be bigger and louder, but are those things necessarily beneficial? I would rather sit in a concert or a church somewhere and hear a fine mix with attention to detail than a loud mix with everything super big and bombastic.
• Every once in a while, bypass the EQ of an instrument you've been working on to make sure you are actually making it sound better!
In A Nutshell:
1. It is better to cut than to boost
2. When boosting, use a wider bandwidth (if available).
3. When cutting, use a narrower bandwidth (if available).
4. When first starting out, limit yourself to cutting or boosting no more than 6 decibels. This will force you into cutting more than boosting, and it will also make you think about mic placement and mic choices rather than just EQ'ing first.
5. It's always good to start out with the EQ flat and adjust from there
6. Don't EQ just because you can. Have a sonic goal!
7. After you've exhausted your options in microphone choice and mic placement, then EQ.
8. Make sure the instrument you are EQ'ing is in good repair, the strings aren't ancient, the drum heads are fresh, the drums are tuned, the batteries are fresh on instruments with active pickups, etc.
9. When EQ'ing, your goal is to make the instrument as natural sounding as possible.
10. When EQ'ing, feel free to use the EQ bypass button (if present) to see if you are actually improving things.
11. Use a High Pass filter to filter out any sub-sonic low bass stuff from instruments that don't occupy that frequency range. For instance, you won't have anything useable in the 80hz range on a vocal. High-Passing will allow you to "cut out" low frequencies that wouldn't be useful for a vocal, thus getting rid of a lot of mic handling noise, boom, thuds, and plosives.
What Frequency Does What?
- 20 - 40hz - Almost Useless.
- 50-60hz - Very low end warmth for bass instruments
- 70 - 80hz - The Boom. Gives more power in kick drums and toms.
- 100-150hz - Thud in Low Instruments or Harshness in Low End.
- 180-250hz - Warmth. This range can be used to warm up shrill vocals when boosted.
- 400hz - Boost this to bring out definition in bass guitar lines.
- 500-800hz - Low Ring in snares and/or mid-range mud in acoustic instruments. Cut around 800hz to possibly improve acoustic guitar tone.
- 1-2khz - The power in music. Gives more vocal-type tone to instruments. Be careful because too much can make an instrument sound nasally.
- 3-4khz - Brings out clarity in picking stringed instruments when boosting this frequency. Boost for more attack on a kick drum.
- 5khz - A little bit can be magical, while too much can be terrible. Can bring clarity to an instrument when used sparingly.
- 6-7khz - The sizzle in snares and cymbals. Dead snare? Boost it. If a vocalist has very strong "S" sounds, you can cut this frequency.
- 8-10khz - the ssssss in cymbalsssss.
- 12-15khz - Air & "breath" in music.
- 17-20khz - Dogs & babies can hear it
Feel free to download a copy of our EQ chart to use for reference while you're mixing:
| eq_chart.pdf |
A NOTE ABOUT PHASE SHIFT IN EQUALIZATION
First, what is it?
Basically, there are two types of signal categories in an EQ: frequencies that are not affected by the EQ and frequencies that are. In an analog EQ, once that signal goes through extra circuitry because of a boost or cut in a frequency, it will be ever so slightly delayed (slower) than the rest of the signal. It's a very tiny amount (like a fraction of a second), but it's there. So this means that if you boost let's say 2k, that part of the signal is routed to extra circuitry and is delayed a very tiny amount. This small delay causes an ever slight phase shift.
Is This A Big Deal? Should I Be Worried About It?
No! It's called normal. Don't allow terms like - "Minimum Phase Shift EQ" - from manufacturer's marketing hype influence you to buy their product over someone else's. All EQ's have roughly the same non-perceivable phase shift with each frequency adjustment. It's called physics, and it's not going to change any time soon. Think for a moment about how much circuitry each signal goes through and how each frequency or set of frequencies are treated differently than others. It's just part of audio. Really the thing to be concerned about when choosing an outboard EQ is:
a. sound quality
b. reliability
c. build quality
d. reputation
e. low noise
f. features
Disclaimer: The above is strictly speaking about manufacturer's using nifty marketing terms to try and set their EQ apart from any other! The above is not to be confused with Phase & Polarity when setting up microphones and such. That can be very important and IS something to be careful with and worried about
|
|
