Compression
It's Easy!

Compression is like having a finger on a volume control (fader).
• If a sound gets too loud, it'll turn the volume down.
• If the sound is too soft, it can bring up the volume.
• It can wait a few moments before it makes an adjustment.
• It can wait for a little bit after the sound passes before the volume will go back where it was before.
This, in a nutshell, is what the controls on a compressor do.
Here is a breakdown of what each control on a compressor does:
Threshold
The threshold tells the compressor at what audio (decibel) level to start compressing. In other words, if you tell it to start compressing at -6db, when the volume of an instrument hits -6db, the signal will start to be compressed at that point.
Ratio
Ratio and Threshold Work Together. “Ratio” is the amount the audio signal may go above the chosen threshold. To determine this, follow this formula:
If the ratio is set to 2:1, invert the 2:1 and turn it into a fraction = 1/2.
For example, if the threshold is set to -6db, and your ratio is set to 2:1 - when the audio signal gets up to -6db, the compressor will only allow 1/2 of the original signal above the threshold. If the ratio is set to 4:1, it will only allow 1/4 of the signal. If the ration is set to 6:1, only 1/6 of the signal will be allowed over the threshold. If the compressor is set to infinity, then your compressor has been turned into a limiter, and it won't let any sound above the threshold.
Check out my handy dandy Compression Ratio Chart for reference:
Attack
The attack knob tells the compressor how quickly (or slowly) to reach full compression after the signal has reached the threshold. This is useful if you want to maintain some of the "punch" and dynamics of a signal but still want to control its volume. Let's say that you have a kick drum, and you want to preserve its initial transient (the first part of the hit); you can dial your attack to start a little bit after the start of the drum hit happens and then compress from there. This will in turn let the initial hit of the drum pass through uncompressed, and then start compressing at the designated time you have set the attack to. For example, if you set the attack to 20 ms, the compressor will start compressing the signal as soon as it hits the threshold and will reach full compression at 20 ms.
Release
As you can imagine, this control tells your compressor how fast (or slow) to end the compression after it no longer reaches the threshold. For instance, if you set your release to 150 ms, that means that the compression will end or "release" 150 ms after the signal goes below the threshold.
Make-up Gain / Volume / Output Volume (labeled differently on different compressors)
Let's use that example about the kick drum again. Make-Up Gain brings up lower sounds and makes them more audible while the threshold keeps louder sounds compressed. This in turn levels out the signal, and makes the signal more consistent and even. It is very common to turn up the make-up gain to the same amount of decibels that the compressor is compressing. So, if the compressor's gain reduction meter shows -3 db, you can adjust the make-up gain to boost 3 db on the output.
Some Compressors Have a "Knee" Control
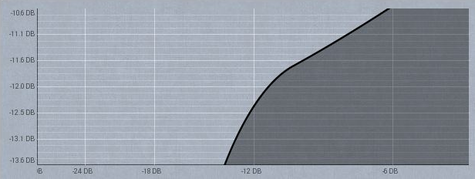
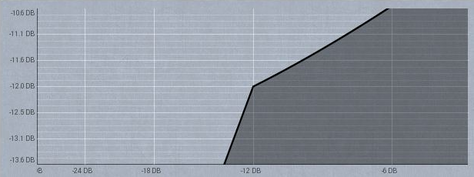
The “knee” tells the compressor how soft or hard to compress the signal once it compresses. It is called a "knee" because the slope the signal takes towards compression looks kind of like the bend of a knee. Just know that a hard knee is typically better for a bass instrument like a kick drum or bass guitar; a softer knee would be great for vocals, strings, or cymbals. The lower the register an instrument produces in the frequency spectrum, the harder the knee can be set. There are some cases this is not necessarily true, like a hard compressed "spitty" vocal, or a trashy sounding drum overheads track. The softer the knee, the more gradually the instrument will compress when it reaches the threshold. With a hard knee, the signal does not gradually compress but rather goes straight into compression.
Some compressors have an "Auto" Button
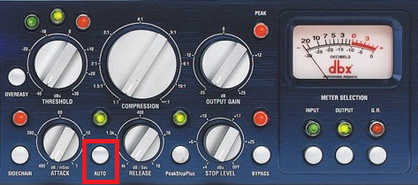
The auto button adjusts the attack and release times according to the source material it "sees." This is pretty handy if you are a beginner and are unsure about setting the attack and release times, but it can yield less than stellar results on some material. Some compressors just have an auto button for the release time but not the attack.
Here are some practical tips for a beginner when using a compressor. These are not formulas of any kind, but can still be helpful:
• The "magic" attack time is 12ms. This works for a variety of instruments in the mid- and treble ranges.
• When starting out, adjust the threshold where to compress only 3-4 db on the gain reduction (GR) meter.
• For bass type instruments, like electric bass guitar and kick drum, use higher ratios. 6:1 or even 20:1/Infinity are fine. You can also use harder knees.
• Lower ratios and softer knees are typically better for mid-range and treble instruments, like 2:1 to 4:1
• When compressing Strings (like violin, viola, cello, etc.), use lower ratios and softer knees for a more "transparent" response.
• A faster release time reduces the “squishy” sounds of a compressor known as “artifacts.”
• Limiters are great for bass instruments and sub-groups.
• When turning a ratio to its maximum setting, like 20:1, you essentially create a limiter.
• Look up the article in the Magnificent Sub-Bus section about "multing." Fun Stuff!
• Turn up the make-up gain (output) the same amount of dB the compressor is compressing. E.g., if you are compressing to -4 db, turn up the make-up gain the same amount.
• The slower the attack time, the more initial "hit" or "pluck" you will get from the instrument. For more punch on a kick drum, set the attack to around 15ms to 20ms. This will let the initial transient through.
Ratio Times for Different Instruments (very general guidelines):
1. Kick 6:1 for rock. 3:1 to 4:1 for softer music.
2. Snare 2.5:1 to 4:1 for rock. 2:1 to 3:1 for softer music.
3. Toms 3:1 to 4:1
4. Overheads 2:1 to 3:1
5. Percussion 2.5:1 to 4:1
6. Bass Guitar 4:1 to 20:1 (Infinity), depending on what you are going for and how consistently the bass player is playing.
7. Keys 2:1 to 4:1
8. Real Piano Same as keys. Be careful.
9. Rhodes 2.5:1 to 4:1
10. Organ 3:1 to 6:1 - depending on how aggressively the organ is being played. Traditional hymns - 2:1 to 4:1.
11. Electric Guitar 2:1 to 4:1
12. Acoustic Guitar 2:1 to 4:1
13. Choir Mics 2:1 to 4:1 Be careful compressing condenser choir mics. Stage noise can become an issue.
14. Vocals Traditional Hymn type - 2:1 to 3:1 Modern Rock Worship - 2.5:1 to 6:1
15. Strings 2:1 to 4:1 (Like violin, viola, cello, etc)
16. Harmonica 2:1 to 4:1
17. Mandolin 2:1 to 3:1
A Note: When first starting out, it is better to gravitate towards lower ratio settings and only compress 3db to 4db. If your compressor has an "Auto" button, there is nothing wrong with using it until you understand how to set attack and release times. If you have a DBX compressor, feel free to use their "Overeasy" function for "softer" compression unless it is a bass instrument of some sort.
Feel free to download our compression ratio worksheet for reference when mixing:
| compression_ratio_chart.pdf | |
| File Size: | 356 kb |
| File Type: | |


