THE INS & OUTS - CONNECTING GEAR
**Disclaimer: Yes I know you probably have a digital console. I am teaching this material from an analog perspective so that there will be a common denominator as to the functionality of audio device controls, their connections, and their general use. Every digital console can be radically different as to which menu/screen a certain function can be located. My goal is to teach these concepts in a very concise and easy to understand manner without being bogged down with each manufacturer's menu preference. "On a Yamaha Rivage, this can be found.... On a Behringer X32, this can be found...."
The Different Connectors in Audio
XLR
This is one of the most commonly used connectors in audio. It is used mainly for microphone cables. This is a balanced audio connection.
This is one of the most commonly used connectors in audio. It is used mainly for microphone cables. This is a balanced audio connection.
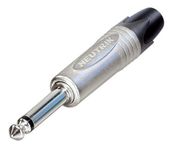
1/4" Tip Sleeve (TS)
This is another of the most commonly used connectors in audio. This connector is mostly used for instruments like electric guitar, bass, and keyboard. If necessary, it can also be used for patching audio in and out of mixing consoles, rack effects, EQs, etc., but the tip ring sleeve connector is preferred for those purposes because it is balanced like an XLR connector (see below).
This is another of the most commonly used connectors in audio. This connector is mostly used for instruments like electric guitar, bass, and keyboard. If necessary, it can also be used for patching audio in and out of mixing consoles, rack effects, EQs, etc., but the tip ring sleeve connector is preferred for those purposes because it is balanced like an XLR connector (see below).
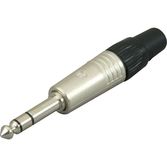
1/4" Tip Ring Sleeve (TRS)
The TRS connector is mainly used on the live sound engineer side of the sanctuary. It is a balanced audio connection (like the XLR connector), mostly used on mixing consoles for general PA system connections, insert cables, 1/4" stereo connections, patching rack effects, etc.
The TRS connector is mainly used on the live sound engineer side of the sanctuary. It is a balanced audio connection (like the XLR connector), mostly used on mixing consoles for general PA system connections, insert cables, 1/4" stereo connections, patching rack effects, etc.
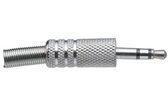
1/8" Tip Ring Sleeve
This connector is mostly used for headphones, stereo connections on computers, and other mobile devices. This connector is comprised of 3 sections. The tip is the Left side of the signal; the ring is the Right side of the signal, and the sleeve is the ground connection of the cable, typically attached to the cable shielding.
This connector is mostly used for headphones, stereo connections on computers, and other mobile devices. This connector is comprised of 3 sections. The tip is the Left side of the signal; the ring is the Right side of the signal, and the sleeve is the ground connection of the cable, typically attached to the cable shielding.
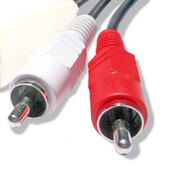
RCA
One of the most easily recognizable connectors, this connector is used mainly for stereo connections from CD players, DVD audio out, recorders, etc. The white-sleeved connector stands for the Left side (L) of the stereo signal, and the red-sleeved connector is used for the right side (R) of the stereo signal.
One of the most easily recognizable connectors, this connector is used mainly for stereo connections from CD players, DVD audio out, recorders, etc. The white-sleeved connector stands for the Left side (L) of the stereo signal, and the red-sleeved connector is used for the right side (R) of the stereo signal.
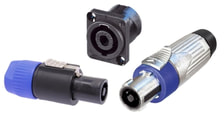
Speakon
Speakon connectors are primarily used for feeding amplified audio to speakers. The speakon connector is great because it can lock onto both the amp and the speaker and maintain a very reliable, solid connection. This connector most commonly has either two or four pins. This means that you can send different signals to the tweeter in a bi-amplified configuration with a 4-pin speakon connector.
Speakon connectors are primarily used for feeding amplified audio to speakers. The speakon connector is great because it can lock onto both the amp and the speaker and maintain a very reliable, solid connection. This connector most commonly has either two or four pins. This means that you can send different signals to the tweeter in a bi-amplified configuration with a 4-pin speakon connector.
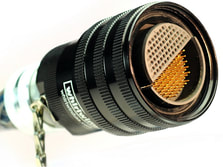
MASS
These connectors are mainly used to very quickly and conveniently connect a mass amount of audio signals from one device to another and then be able to quickly break that cabling down. Each pin represents a separate channel of audio. MASS connectors do not have male/female designations but rather input/output designations. These are killer beans for larger shows and tours. This makes it a breeze to connect a MASSive amount of signals at once.
These connectors are mainly used to very quickly and conveniently connect a mass amount of audio signals from one device to another and then be able to quickly break that cabling down. Each pin represents a separate channel of audio. MASS connectors do not have male/female designations but rather input/output designations. These are killer beans for larger shows and tours. This makes it a breeze to connect a MASSive amount of signals at once.
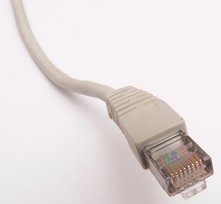
RJ-45
In recent years, the RJ-45 connector has taken a big leap into audio. In everything from in-ear monitoring systems (like Aviom and others) to controlling power amplifiers, as well as extending video and audio signals to great lengths, the RJ-45 has really taken off as a viable connection source for digital devices.
In recent years, the RJ-45 connector has taken a big leap into audio. In everything from in-ear monitoring systems (like Aviom and others) to controlling power amplifiers, as well as extending video and audio signals to great lengths, the RJ-45 has really taken off as a viable connection source for digital devices.
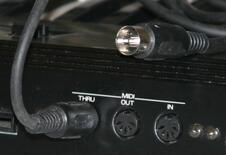
MIDI (DIN)
Originally developed in the late seventies and released in the early eighties, MIDI was a huge revelation to the audio community. It still has an important place in the audio world for connecting keyboards, computers, control surfaces, pedalboards, and syncing components via MIDI sync. Most recording software record MIDI so that different plug-in instruments can be chosen during post-production. When I owned a recording studio, I almost always recorded MIDI of the original keyboard track so that I could experiment with different piano and pad sounds during the mixing stage.
Originally developed in the late seventies and released in the early eighties, MIDI was a huge revelation to the audio community. It still has an important place in the audio world for connecting keyboards, computers, control surfaces, pedalboards, and syncing components via MIDI sync. Most recording software record MIDI so that different plug-in instruments can be chosen during post-production. When I owned a recording studio, I almost always recorded MIDI of the original keyboard track so that I could experiment with different piano and pad sounds during the mixing stage.
Cool Tip On Connecting Gear
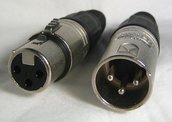
A trick you may not have heard before, is that on an XLR connector, the direction of the pins, is the direction the audio travels. Let's look at a couple of examples:
A trick you may not have heard before, is that on an XLR connector, the direction of the pins, is the direction the audio travels. Let's look at a couple of examples:
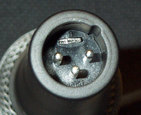
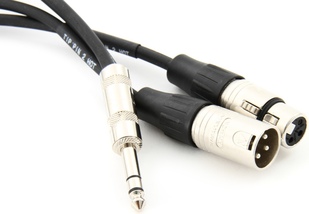
On the bottom of a microphone (left picture), you will see 3 pins. On an XLR connector, audio flows the way the pins are facing, so we can know that this microphone is sending audio out. The XLR cable in the right picture shows the female end where it will be connected to the microphone, so the audio signal will be sent out of the microphone into the cable.
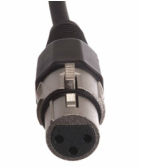
The XLR cable in this picture shows the female end where it will be connected to the microphone, so the audio signal will be sent out of the microphone into the cable.
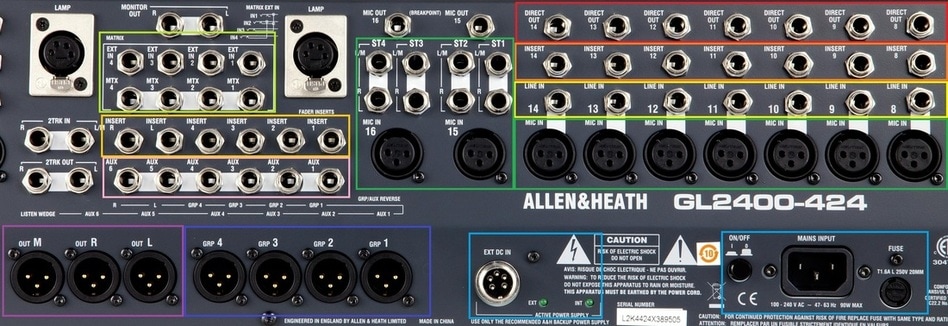
The Ins & Outs of a Mixing Console (refer to the picture below, starting on the right):
Direct Out (Red Section): This is the section of the mixing console where you can send the signal from each channel to a recorder or another device.
Insert (Dark Orange Section): This is the section where you can insert an external processor (like a compressor) into each channel, and it becomes an extension of that channel.
Line In (Yellow Section): You can input a line level signal here. This could include the output of an effects processor, an audio player, a drum machine, etc. On most consoles, you have to press the "Line/PAD" button to "turn on" the Line input of each channel.
Mic In (Dark Green Section): Just as it sounds. This is where you can plug in a microphone or a snake channel feeding from a microphone on stage.
Power (Light Blue Section): With this particular console, you have the option of running an external power supply, or use the internal power supply already supplied inside the unit. Most churches will run the internal since there isn't anything extra to buy, whereas a live sound contractor may opt for the external power supply for its ruggedness, the ability to rack mount it, and the supposed lower noise floor. In the power section, you may also notice an on/off button and a fuse holder. If you ever blow a fuse, make sure you replace it with the right fuse. I have a friend that has this console, and he kept blowing fuses. He wanted me to come take a look at it, and I soon discovered he was using the wrong fuses. He was using fast-blow instead of slow-blow.
Mix Matrix or Matrix Mixer (Light Green Section): This section is basically a mixer within a mixer. You can use a mix matrix for sending signals from the console to other mix areas like a balcony, side fills, front fills, another console, cry rooms, foyers, all feeding from the buss or the mains. Pretty handy dandy. We'll get more into matrix mixing on this site at a later date, but it’s pretty simple stuff, really.
Sub Group & L/R Mains Inserts (Light Orange Section): This section contains the insert points for inserting a compressor or other outboard processor to one of the sub-groups or L/R Mains. Check out our section about Insert Cables below to get a full understanding of this concept.
Auxiliary Sends (Pink Section): The auxiliary send section is for sending out audio to things like stage monitors, headphone mixes, effects processors, etc. You can read more about this on our "Demystifying The Mixing Console" page.
Subgroups Out (Dark Blue Section): This section is for sending audio out directly from any of the four sub-groups in this console.
L/R, Mono Main Out (Purple Section): This section is the main out section of the mixing console. It is basically all of the signals from all of its channels. L means Left, and R means Right. While most churches tend to run mono, if you are running stereo, you can send separate Left and Right signals to different sides of the room. You determine which instrument is fed to left, right, or a combination of both by adjusting the Pan knob on each mixer channel.
NOTE - Mono Out: This section can be really useful for feeding subwoofers or for even feeding a mono, combined signal, to a recorder or somewhere else for that matter. I know of a church that didn't need their mono out on their console, and decided they'd use it to record their services via a DAW so that they could stream it via the web. Pretty cool!
Lamp: In the above console picture, there are two inputs for attaching lamps so that you can see in a very dark environment. Basically each lamp will attach to the back of the console and will curve over so that the light can be angled and adjusted where you can see the controls of the mixing console. Littlite is a great source for mixing console lights.
Recording Side Note:
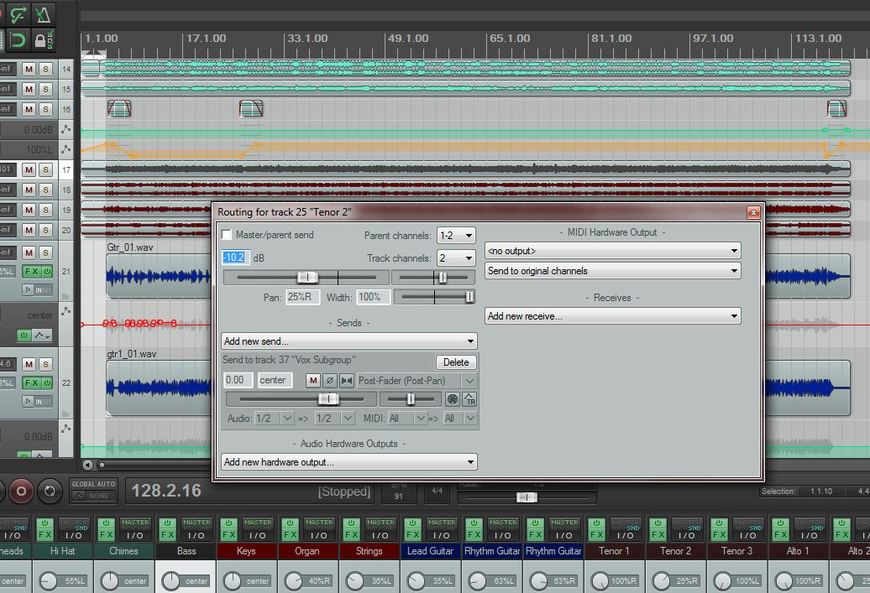
In a DAW (digital audio workstation), there is a section where all of the sends and receives are laid out. This is accomplished with a mouse and a menu. On an analog console, cables physically connect the console to and effects unit or dynamic processor or to send an audio signal to a particular location. You press a button, like sub-grouping ...
The Mighty Insert Cable
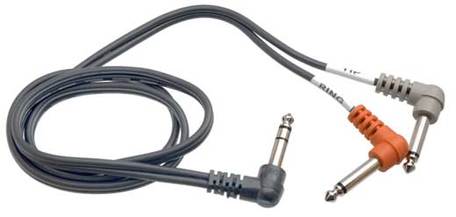
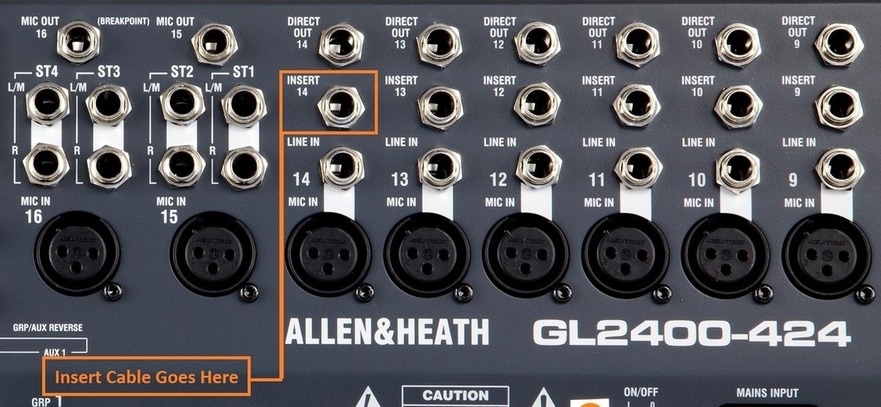
An insert cable is run from a mixing console channel insert, auxiliary insert, or mains insert to a dynamic processor (like a compressor) or even an EQ. Typical insert cables look like this
An insert cable is run from a mixing console channel insert, auxiliary insert, or mains insert to a dynamic processor (like a compressor) or even an EQ. Typical insert cables look like this
The TRS connector has 3 sections on it: the tip, the ring, and the sleeve. The tip sends the signal to the effects/dynamics processor, the ring is the return of the audio signal back from the effects/dynamics processor, and the sleeve is the common ground of the circuit.
Tip = Send. Ring = Return. Sleeve = Ground of both.
Tip = Send. Ring = Return. Sleeve = Ground of both.
The TRS end of the insert cable is plugged into the insert jack of whatever mixing console channel you'd like to effect. From there, the cable then runs to an outboard processor of your choice, like this DBX compressor, for instance:
Now that this compressor has been inserted into this channel (channel 14 in this example), it has become part of that channel and can be used to compress whatever instrument resides there. This is basically an effects loop for every channel.
**Cool Tip Alert: The insert jack on a mixing console can also be used in a pinch, as a direct out for recording if your mixing console doesn't have a direct output. This is accomplished by taking a regular TS 1/4" cable, and inserting it into the insert jack until you hear 1 click. In other words, don't insert the 1/4" plug all the way into the insert jack. Just insert it enough until you hear/feel the first "click." From there, you can run the other end of that 1/4" cable to the input of a recording interface, and record whatever instrument is on that channel.
Using Effects With An Analog Mixing Console
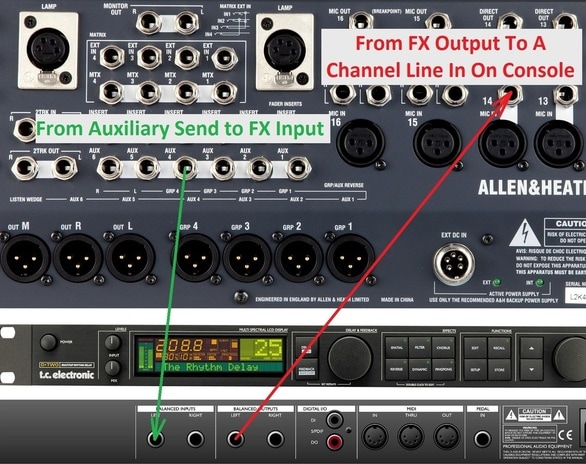
The most effective way to connect the mixing console to the rack effects is to send a 1/4" cable from an auxiliary output to the input of your effects processor, then from the effects output to a mixing console channel line in. This is great because you can now EQ your effects by using the parametric EQ located on the mixing console channel. For example: If you'd like a darker reverb, you can EQ it that way. Also, if you'd like to put a little reverb into the stage monitors for vocals or any other instrument, you can now do that via the auxes that feed the musician's monitors from your reverb channel you just set up.
Multing
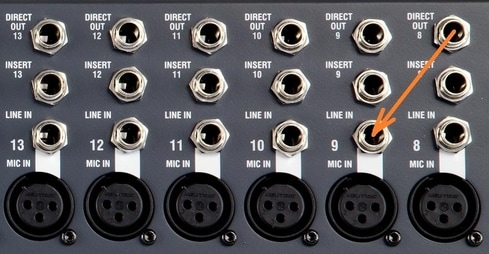
Multing is the process of taking the output of one channel, and running it into the input of another channel. This essentially puts the same instrument on two channels. So what is the usefulness of Multing? Mostly multing is used for parallel processing an instrument. What this means, is that you can have one channel with no effects or compression on it, while the other channel you can use for effects and compression. So basically, you have a wet and dry channel for one instrument. An example of this is using multing on a vocal track. The original track is clean, while the other track can have heavy compression on it. The clean channel can be used as your main vocal track, and then you can bring in the multed heavily compressed track right under the clean track and blend to taste. You can also bring down the treble on the multed/compressed track to bury it a little further in the mix. This will give a vocal track power and bring it out front a little easier. This technique can be used on snare, kick drum, overheads, bass, background vocals, etc. Not only can it be used for compression, but is especially powerful when used with reverb and/or delay as well. Really, the sky is the limit; you are only limited by your imagination. I have even used multing with distortion blended in very lightly with the original clean channel for bass guitar!
D.I. Boxes
|
|
|
Speaker Cable and Power Cable Basics
This webinar will cover the basics of NL4 and NL8 speaker cables and connectors, troubleshooting and repair as well as manufacturing new cables. This will also touch base on American 110 volt power connectors and cable, Edison, Powercon, 3 pin 4 pin and 5 pin twistlock connectors, as well as a 15-minute Q&A segment.
