DEMYSTIFYING THE MIXING CONSOLE
**Disclaimer: Yes I know you probably have a digital console. I am teaching this material from an analog perspective so that there will be a common denominator as to the functionality of audio device controls, their connections, and their general use. Every digital console can be radically different as to which menu/screen a certain function can be located. My goal is to teach these concepts in a very concise and easy to understand manner without being bogged down with each manufacturer's menu preference. "On a Yamaha Rivage, this can be found.... On a Behringer X32, this can be found...."
At first approach, the mixing console can be very intimidating. You may think, "Oh my, look at all those knobs and switches!" Actually, though, a mixing console has only a few sections. Once you break it down into those sections, you will get a much firmer grasp on how a mixing console works.
On this page you will learn how to use a mixing console and what each section and part does.
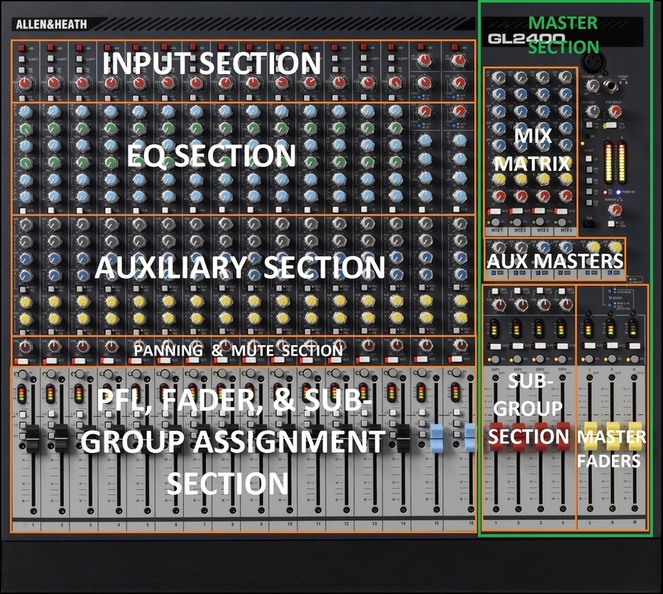
The image below shows a mixing console with the different sections labeled. Each section has its own function, and once you learn them, mastering the use of a mixing console becomes a lot easier. Not all mixing consoles are the same. Some have more options and tools than others, but here I will cover the Allen & Heath GL series - one of the best for the money!
Also, keep in mind that the same basic elements of an analog console are also present in a digital console! Below, we use an analog console for reference so that it will give you a visual learning tool of the different sections involved. A digital console has the same sections but are usually behind different menus on a screen.
|
|

Most of the mixing console is simply a repeat of the same set of controls called a channel strip.
This is a picture of what a typical channel strip looks like. Just knowing that most of the real estate of a console is just a repeat of the same things will help you not be so overwhelmed by the sheer number of controls.
A description of what each knob and switch does is further down on this page. This will help you get a firmer grasp of what each part does. Read each section thoroughly. Don't skip.
What do all those knobs and buttons do?
Before you can turn out a good mix, you must first learn what your mixing console does and how to use it. I have been in countless facilities in which the volunteer/engineer wasn't even for sure what everything did on the console! So, if that's you, now is your time to fully grasp every control! We’ll start from the top of the console and work our way down so that you can learn the powerful tools available to you
Before you can turn out a good mix, you must first learn what your mixing console does and how to use it. I have been in countless facilities in which the volunteer/engineer wasn't even for sure what everything did on the console! So, if that's you, now is your time to fully grasp every control! We’ll start from the top of the console and work our way down so that you can learn the powerful tools available to you
 Trim/Gain
Trim/Gain
This control sets the input level going into the relative channel below it. Here's how to set it:
• Have the whole band play a song.
• From the Drums all the way up the instrument list, set one channel at a time.
• Press the PFL button (described below) for the channel for which you want to set the gain. Make sure that only one channel at a time has its PFL button pressed.
• Now look at the master section of the mixer. You will notice 2 rows of LEDs. This is called a VU meter.
• Starting from its lowest position, adjust the gain/trim control upward until the loudest parts of the signal you are adjusting peaks at zero on the VU meter.
• Once the level is peaking at zero, depress the PFL button on the channel you just adjusted, and move to the next channel - repeating the process until every active channel's gain has been set to zero. It's okay on an analog mixing console to have an occasional peak here and there. Don't be too OCD about it. Occasional peaking on a kick drum and snare is normal. Remember your computer/cd audio channels as well.
Digital Side Note: Hitting zero dB in the analog realm is totally fine, but zero in the digital domain is clipping. Analog clipping can sound really great, but digital clipping usually sounds terrible. Again: Zero in the analog realm is fine, but in the digital domain, it's not. If you are setting the level while recording into a DAW, around -18 dB is a great place to start.
 Polarity
Polarity Switch
The polarity switch sets the polarity of an audio signal to 180 degrees opposite of its original state. The polarity switch has numerous uses that can really improve your mix.
1. If you are miking a snare drum both on the top and bottom heads, you will need to switch the polarity of the bottom microphone because, as the top head of the snare is moving AWAY from the top mic as the drum is being struck, the bottom head of the snare drum is moving TOWARDS the microphone on the bottom. If you don't reverse the polarity of the bottom microphone, the 2 signals you are receiving will be 180 degrees out of "phase," (polarity and phase are two different things, but we'll cover that later) and usually the low end of the snare becomes weak because frequencies will cancel each other out.
2. Use the polarity switch for front and rear miking of a guitar amp for the same reason. When front and rear miking a guitar amp, the same technique holds true; reverse the polarity of the rear mic to keep the guitar sounding full.
3. Another use of the polarity switch is for bringing clarity and distinction to an instrument that is being covered up (stepped on) by another one. Sometimes you can bring separation between a kick drum and a bass guitar just by hitting their respective polarity switches.
 48v Phantom
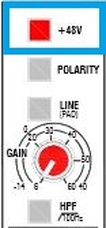
Phantom Power (+48v)
Some microphones and other devices need power to work, like condenser microphones, active direct boxes, some acoustic instrument preamps, etc. Be careful not to use phantom power on most ribbon microphones. You can actually melt the ribbon element inside the mic, thus ruining it. Exceptions to this principle are the ribbon microphones manufactured by Royer.
Some microphones and other devices need power to work, like condenser microphones, active direct boxes, some acoustic instrument preamps, etc. Be careful not to use phantom power on most ribbon microphones. You can actually melt the ribbon element inside the mic, thus ruining it. Exceptions to this principle are the ribbon microphones manufactured by Royer.
 Hi-Pass Filter
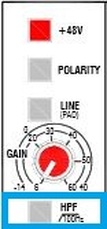
High Pass Filter Button
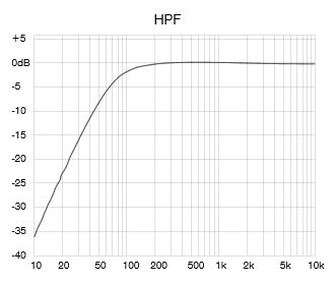
Most mixing consoles have a high pass filter button. What this button does is filter out bass frequencies at a certain set point and lets the other frequencies "pass" through. This is useful for instruments that cannot reach that low on the bass side of the frequency spectrum. For instance, a human voice is going to have little to offer below 80hz; it just doesn't reach that low. By cutting out the lower bass frequencies on a vocal channel, you effectively filter out a lot of the handling noise, incidental booms, plosives, etc., without affecting the vocal itself.
Using the high pass filter button will in essence clean up a mix once you learn which instruments take up which parts of the frequency spectrum. To put it simply, enable the High Pass button on all of the instruments EXCEPT for the following: kick drum, toms, bass guitar, piano, keyboard (although sometimes it can really help for clarity's sake to enable it for keyboards), loops, and CD/Computer music playback channels; this is important because their ranges can extend to very low frequencies. But a high pass filter will really help to contribute to the definition and clarity of instruments like snare drums, guitars, vocals, cymbals, violins, and the like.
 Line / PAD
The Line/PAD Button
When you have an instrument that has a very loud output, no matter what you do, and you cannot turn it down low enough on your gain/trim knob to get it to a reasonable level, press the "Pad" button, and it will bring the sound to a reasonable level (usually anywhere from 10db to 20db in gain reduction) where you can adjust accordingly. Also press this button to reach an appropriate level if you have a line signal coming into that channel.
When you have an instrument that has a very loud output, no matter what you do, and you cannot turn it down low enough on your gain/trim knob to get it to a reasonable level, press the "Pad" button, and it will bring the sound to a reasonable level (usually anywhere from 10db to 20db in gain reduction) where you can adjust accordingly. Also press this button to reach an appropriate level if you have a line signal coming into that channel.
|
|
 EQ Section
EQ Section
This is the section of the console in which you make tonal changes to an instrument. We have a whole section regarding Equalization here!
EQ In/Out button
This button is used to actually bypass (or enable) the EQ circuit in the mixing console. Sometimes when EQing an instrument, I press the EQ bypass button just to make sure that what I was doing was actually helping!
 Auxiliary Section
Auxiliary Section
The auxiliary section of the mixing console allows a user to send signals to or receive signals from each channel of a mixing console. For instance, you can adjust the volume of each instrument in someone's monitor by using the auxes (short for auxiliary). You could also send an instrument to a reverb via an auxiliary send; then you can feed the output of the reverb processor back into an empty channel on the mixing console. In this way you have the ability to adjust the gain, EQ, and volume of an effect.
Post/Pre Button in the Auxiliary section
This allows the auxiliary section to be placed either before (pre), or after (post) each channel's fader. For most scenarios, it is best to make sure the button is enabled for the auxes to be placed before the channel's fader so that their volumes will not be affected by where you place the fader. This is important especially if you are running your monitor mixes via the auxiliaries; you don't want your monitor mixes changing every time you move a fader. Again, in this situation, make sure that the auxiliaries are set to "pre."
 Pan, PFL, Subgroup, and Fader Section
Pan
The pan knob is especially useful when running a stereo mix. “Stereo” means that you have the ability to put an instrument either in the left speaker, the right speaker, or anywhere in-between. Panning is a great way to give an instrument its own space thus retaining its clarity and differentiating it from other instruments.
Side Note: Running a stereo configuration in a live setting is good for narrow rooms but not so much for wider rooms. Why? If you are in a wide room and pan an instrument or a voice all the way to one side, it's very possible that someone on the other side of the room would barely be able to hear it at all. For this reason, most sound systems are run in mono. Panning in a mono system can also be used for setting which sub-group fader is getting the signal. The odd numbered sub-group faders are to the left, and the even numbers are to the right.
Super Cool Recording Tip: If you want to feature a musical part (like a guitar solo), and you want it really prominent in the mix, pan that instrument to whatever side the person would be driving. People drive on the left side of the car in America, whereas in the UK, they drive on the right side.
Mute Button
This button "mutes" or turns off the channel so as that no sound is heard on the channel. In mixing, sometimes the mute button is one of the most powerful tools you can have.
PFL
This means “Pre-Fader Listen”, and it does exactly that. It allows you to listen to the audio of that channel before it hits the fader. This is useful because you can plug in your headphones into the headphone out of the mixing console and hear what is going on in that channel. This is ideal for isolating a channel in order to hear what is going in your headphones while everything else is still going. PFL is also great for "zeroing" out your console as we have discussed before.
Sub-Group Select Buttons
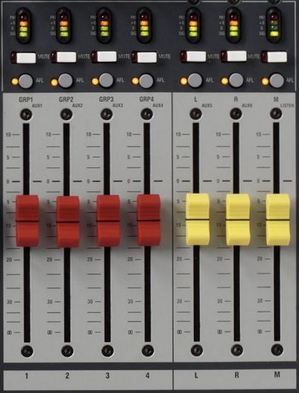
(usually will be labeled 1, 2, 3, 4 or 1, 2, 3, 4, 5, 6, 7, 8) - These buttons will allow a channel to be sent to a sub-group so that similar instruments can be grouped to one or more sub-master faders - as shown in RED in the picture below. This is great for something like drums. This means that instead of trying to turn down all faders at one time on a large drum set, you can choose a sub group to send all of the drums to and control them all at one time with one fader in the master section. They usually will be a different color than the master fader; most of the time they are red. This may be confusing, but we will go into more detail about how to do this later. Not covered here are Mute Groups, but you can basically select many instruments to mute at the same time with just one mute button in the master section.
L-R Button
This button tells the channel to go straight to the L-R master fader(s) - the yellow faders to the left, which then goes to the house mains. The L-R button is also featured on each sub-group fader in the master section of the mixing console. So basically you can turn off the L-R button on each drum of the drum set, and press, say, the #1 sub-group select button. This will send all drums to sub-group 1 and not the master fader first, then from the sub-group to the master (I know I’m not helping on the confusion side of things, but you'll get it pretty quickly once you see it for yourself).
Channel Fader
This control is the final volume of each channel before it is sent to the master section. It is important to mix with the channel fader and not the gain/trim control. Set the gain/trim control initially, and then from there leave it alone. Mix with the channel faders after the console has been set to unity.
A Side NOTE ABOUT VU METERS VERSUS PEAK-READING METERS
What are Meter Ballistics?
This just refers to how quickly or slowly a particular type of meter will respond to the audio level(s) it senses. Some meters have slower ballistics to show you more of an average audio level, whereas the response of other meters is very fast and detailed.
Slow meter ballistics is more common in analog equipment. This is especially so in reel-to-reel tape recorders. You can push the "volume envelope" in tape because there's a natural tape compression that happens with hot signals that can be very pleasing to the ear. This is also the case with tube equipment. Tube clipping is much more pleasant to the ear than solid state clipping because of odd-order harmonics.
Fast meter ballistics is more common in digital equipment because digital clipping can be harsh sounding and a known no-no. If VU meters were the mainstay of digital equipment (it's not), it would be hard to tell on a visual level if your signal were clipping; but peak-reading meters will give you a much faster ballistic (response) to see what is happening in the signal path.
VU Meters
VU means "Volume Unit." Basically, VU meters will show you the average audio level in your equipment. It's built particularly for this purpose. It's designed to move more slowly to show an "average" of the audio level in the signal path.
Peak-Reading Meters
Peak-Reading Metering is exactly how it sounds. This type of metering has much faster ballistics, meaning that the meter's response to the audio level in the signal path is much more detailed and responds much more quickly to each peak (loudest part). Where VU Meters can miss audio peaking/clipping, Peak-Reading Meters are designed to catch them.
Think of it this way - VU Meters show you the forest while Peak-Reading Meters show you the trees.
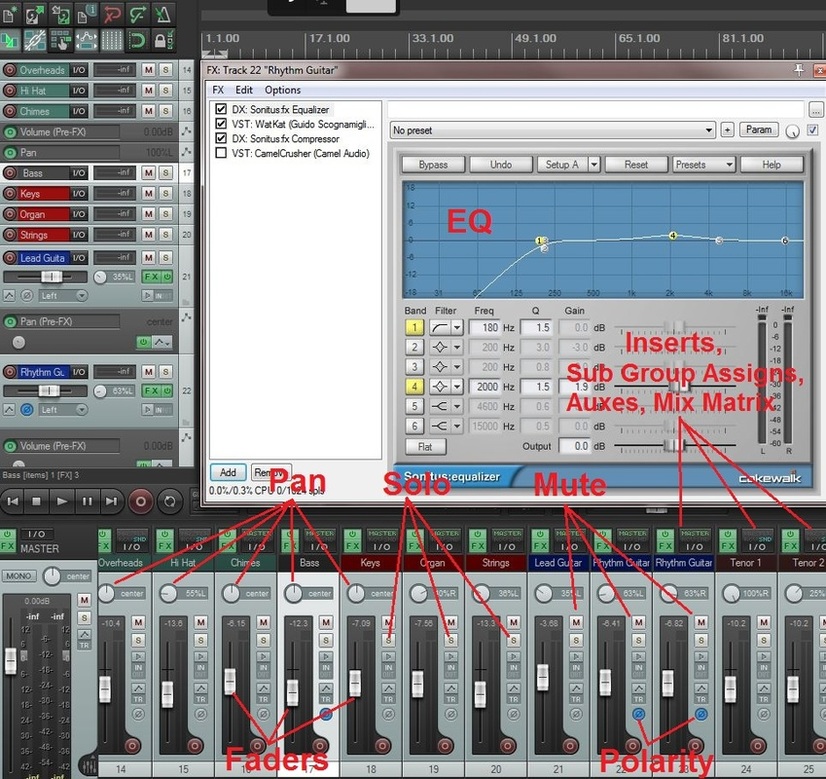
When recording, notice that most interfaces have many of the same type of controls as are found on a mixing console:
That's It!
Super simple! Knowing and using a mixing console isn't all that hard once it is broken down into each section. Now is a good time to go to the "Ins & Outs" page to learn about all of the cable connections on a mixing console. As is done here, we break down each section in a simple, concise manner.
