MIC PLACEMENT
(The Name of the Game)

One of the most important aspects of being an audio engineer is knowing correct mic placement. Too many times this is overlooked, often with dire consequences. When miking an instrument, listen to the tone of the instrument you wish to mic, and, if you have the option, choose a microphone that will match the source of the sound. Each microphone has a sonic personality. Some microphones are bright while others can be very dark. Some are great with very loud instruments while others are terrible. Some would be great on a loud stage while others wouldn't be better for more acoustic settings. With this in mind, we are going to start from the bottom of the instrument list and work our way up regarding mic placement in general and microphone choice in specific. Ideally, if the budget allows, an engineer should plan for a microphone that fits the needs of each situation.
Major Tip: If the instrument you are miking is in disrepair or otherwise sounds horrible, don't expect a great result in house or in recording. Are the drum heads ancient? Are the strings on the guitar buzzing like mad? Is the piano tuned?
Remember, Bad in = Bad Out!
Major Tip: If the instrument you are miking is in disrepair or otherwise sounds horrible, don't expect a great result in house or in recording. Are the drum heads ancient? Are the strings on the guitar buzzing like mad? Is the piano tuned?
Remember, Bad in = Bad Out!
how to mic each instrument
Kick Drum
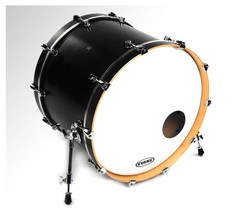
1. One of the most important aspects of getting a good kick drum sound is to make sure the Kick drum actually sounds good! The drummer really should know how to tune all of his/her drums to keep a good drum sound.
2. Another important aspect of a good drum sound is fresh drum heads. I have seen on many occasions (too many to count) drum heads that had absolutely no life left in them, and it sounded as if the drummer were hitting cardboard boxes instead of drums! Make sure drum heads are replaced and tuned at least every 6-8 months by someone who knows how.
3. The third most important aspect in getting a great kick drum sound is choosing the right microphone to do it. Please check out our "What to buy" section regarding this. We also have a kick drum microphone article in our Blog section as well.
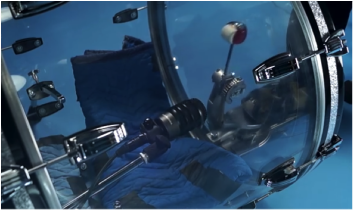 Typically, this is the mic position you'd use if you want more attack. Move it back and you'll have more boom ! Notice how it is placed off-center from the beater head. This is mainly in consideration for how the drum vibrates. For more information on this, look up "circular membrane modes." Very fascinating...
A good place to start out in miking a kick drum is to make sure there is a hole in the resonant head (that's the bass drum head facing the audience). If the resonant head doesn't have a hole, you can either cut a hole with a kick drum hole cutter made expressly for this purpose or purchase a different kick drum head with a pre-cut hole. Make sure you cut a hole large enough to accommodate the boom of a kick drum mic stand and allow room for the mic move around somewhat freely. Another option is to take the resonant head totally off. It looks funny, but it works very well.
Cool Recording Tip Alert: Take off the front head and cover the front with a blanket draped over the back end of the kick drum mic stand.
Also, you'll have to purchase a kick drum mic stand. The only kick drum microphone I know of that doesn’t require a stand is the Shure Beta 91, but other than that, almost all kick drum microphones really need a stand to get the best sound.
Once you have all of the elements together, attach the microphone to both the cable and stand securely; carefully place the microphone inside the kick drum about 6" from the beater head with the microphone pointing off center from where the kick drum beater makes contact with the head.
If you want more attack, place the microphone closer to the beater head; if you'd like more "boom," then move the microphone further away from the beater head. To keep extraneous noises from creeping into the microphone, make sure the kick drum pedal is lubed (no squeaking please), and the microphone cable is securely attached to the stand so that it doesn't come in contact with any part of the drum or resonant head. One more thing: again, make sure the microphone is pointed in the right direction!
|
|
|
Snare Drum
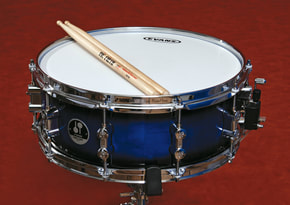
The snare drum is one of the most important instruments in a band; it’s very important to treat and mic it with excellence! Here are some very practical tips:
Make sure you have a good sounding snare! The sound of the snare will only be as good as the snare itself.
Make sure your snare drum has fresh heads. The top head has to be changed more often than the resonant head, but don't totally neglect the bottom head either. If you have a brand new top head and the bottom head is 10+ years, it may be time to change it!
On many churches I have seen several snare drums with snare wire hanging loose or otherwise in disrepair. Make sure to maintain your drums to get consistently good sound, every time you play them.
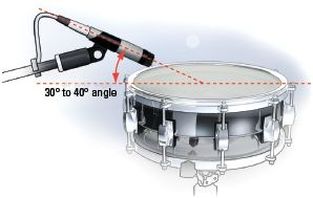
The first step in miking a snare drum is having a good boom stand that reaches beyond the hi-hat. From there, choose a microphone that can handle the amount of decibels a snare drum can exert (which is a lot). Some good snare microphones include: Shure SM57, Audix i5, Sennheiser e604, or the Audio Technica Pro37. From there, position the microphone to where it is about 2" from the top head, pointing towards the center of the snare. This will give a more accurate "picture" of the entire snare's sound. Although there are no strict rules in mic placement, it is a good idea not to mic the snare with the microphone totally straight and perpendicular to the top head. You are bound to get some nasty local resonances and a more "nasally" tone; miking across the head gives a much better overall snare sound.
**Cool Trick Alert: if possible, line up the direction of the snare microphone on the top with the direction of the snare wires on the bottom so that the microphone is "shooting" across the top head on the edge, in-line with the same direction the snare wires are running. This is not always possible, (the drummer may think the mic is in their way), but if you can manage it,this can make a difference in the quality of snare drum sound if you can manage it.
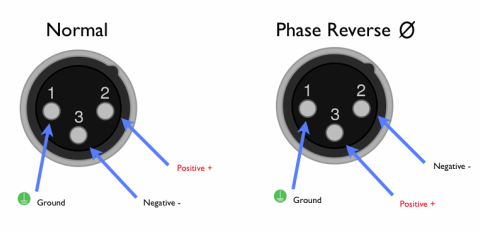
You may feel as if the snare is too dead just top miking it. If you have the resources and the channels available, you can mic the bottom of the snare as well. The only thing to keep in mind, though, is that you'll need to switch the polarity (sometimes wrongly named "phase") at the console for that bottom head channel. Most decent mixing consoles will have a polarity switch. This is important because when you hit a snare drum, the head on top is moving away from the microphone diaphragm, while the bottom head is moving towards the microphone diaphragm on the bottom. This will cause the combination of both snare drum channels (top & bottom microphones) to be 180 degrees out of phase. This will in turn cause the cancellation of certain frequencies and will most commonly cause the snare to sound "thin" and sterile. If you enact the polarity switch on your console on one of the snare channels, this issue will be resolved. If you don't have a polarity switch on your mixing console, you can rewire a microphone cable by switching the wires on pins 2 & 3 on ONE of the XLR connectors (See diagram below) of the microphone cable you are using for the bottom snare. Make sure you label this cable that you have switched its polarity. Once you have switched the polarity, bring up the channel for the bottom snare microphone, blending it to taste with the top microphone.
[diagram]
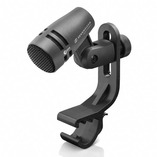 The e604
Toms
Toms are easier to mic than other drums as long as you follow a couple of guidelines. Make sure that they are tuned well, and that the heads still have life in them. From there, the rest is just choosing the correct microphone. One of my favorite microphones for toms is the Sennheiser e604. It has a built-in clip included that holds it on the tom securely. This is an attractive option because it cuts down on the number of stands on stage, and the rubber clip isolates the microphone from extraneous noises—not to mention that it sounds great on toms! Also, if you are buying this microphone for the first time, you can get a price break if you purchase their pack of 3 option. There are more expensive microphones such as: the Sennheiser MD421 or the 441, the Shure Beta 98a, the Josephson e22s, etc, but the Sennheiser e604 can hang with most of these other choices and is very affordable. Another really great tom microphone is the Electro-Voice N D468. This microphone is killer beans! Some of the best tom sounds I have heard comes from this microphone. Often times this microphone is forgotten, but it has been around for ages; it is a classic mic for this purpose. It doesn't come with a built-in stand, but that may not be an issue for your particular situation.
Let's talk about mic placement on toms! It's very similar to the placement on a snare, but I would suggest that where you point the microphone can make a difference in the overall tone in the house. For a brighter tone with more attack, point the microphone straight towards the edge of the tom. For more of a rounded sound with more tone, point it towards the middle of the tom (shooting across the surface of the tom towards the middle).
How To Tune Your Drums
Let's take a break, and watch a video on how to tune your drums. This is a video from the VP of DW Drums on their tuning method. I would also suggest searching out a drum tuning video by Dave Weckl. Both are great methods!
Drum Overheads
There are many different ways to set up drum overhead microphones. Here are the most realistic methods in a live situation:
1. A-B / Spaced Pair (The most common method) – In this arrangement, two microphones are spaced apart to cover each side of the set.
Pros: Good coverage of the entire set.
Cons: Watch phase.
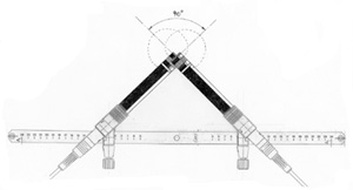
2. X-Y (One of my favorites in a stereo situation for avoiding funky phase issues)--
Two microphones with their diaphragms meeting (but not touching) in a 90 degree configuration.
Pros: No phase issues.
Cons: If you don't place them well, the coverage of the entire set may be weak.
Two microphones with their diaphragms meeting (but not touching) in a 90 degree configuration.
Pros: No phase issues.
Cons: If you don't place them well, the coverage of the entire set may be weak.
The 2 Microphone Method
3. One microphone over the drummer's right shoulder (this is simple and effective if all you have is one overhead microphone). Combine it with a kick mic, and you have your whole set covered. Granted, it's not as precise as separate mics on different parts of the set, but you will have a great overall image of the whole set. It's important to note that you'll need a drummer who can play consistently and can balance the volume of each drum well (this is rare nowadays, ha!).
All you need are 2 microphones and a couple of stands.
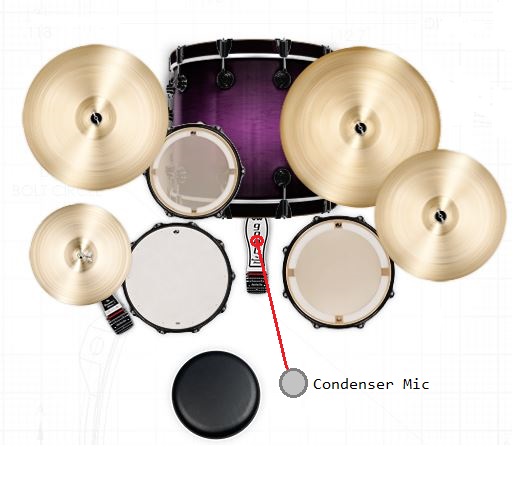
Mic the kick drum with your kick drum mic; then place your boom stand where the condenser microphone is over the right shoulder of the drummer. The microphone should be pointing towards the center of the kit. That's it! The above illustration is a good starting point. Adjust from there. Play around with different mic positions, but this will get you going pretty fast most of the time. Pointing the condenser microphone from the back of the kit towards the front gives a much better representation of the entire kit without having to overcome the placement of the cymbals.
Things to keep in mind:
a. The drummer needs to be consistent in how he/she plays.
b. Make sure the condenser is high enough so that it can capture the entire audio "image" of the kit but not so high where the drum set loses its sonic impact!
c. Remind the drummer where the boom stand is so that it doesn’t get knocked over.
d. Make sure the microphone isn't pointing towards the drummer's head (if they have in-ears); if a stage wedge is used for monitoring, make sure the it isn't firing into the overhead mic!
"What Microphones Do You Recommend? Because We Don't Have A Lot Of Money"
I'm going to list some inexpensive microphones as suggestions. All prices are as if you bought them new. Remember, you can purchase used microphones for usually half of the price of new ones!
Here are some great budget-friendly options (with prices) for decent kick drum microphones:
Sennheiser e902 - $199.95
Shure Beta 91 (you don't even need a stand for this one) - $239
Audio Technica ATM250 - $179 (this model replaced the ATM25 which was a great kick mic).
Peavey 520i (yes I said the "P" word, but it's a killer kick drum mic) - Used Market. Price Varies.
Shure Beta52 - $189
EV RE320 - $299 (more expensive option, but well respected for multiple sources).
There's a ton of other great choices from companies such as Audix, Heil, AKG, etc.
Here are some great budget-friendly options (with prices) for condenser microphones as well:
Audio Technica Pro37 - $169 (this mic is incredibly good for just about any source)
Shure KSM27 - $299 (although I saw one in decent condition at Guitar Center, used, for $139).
Audio Technica 3035 - No longer made, but you can find it for a song on the used market.
Audio Technica 2020 - $99 Cheapo with decent results that came after the 3035.
sE Electronics X1 - $199 great mic for the money with some surprising results.
CAD m179 - $199 Well respected budget-friendly microphone that's very versatile.
- A kick drum mic
- A condenser mic
- A boom stand
- A kick drum mic stand
Mic the kick drum with your kick drum mic; then place your boom stand where the condenser microphone is over the right shoulder of the drummer. The microphone should be pointing towards the center of the kit. That's it! The above illustration is a good starting point. Adjust from there. Play around with different mic positions, but this will get you going pretty fast most of the time. Pointing the condenser microphone from the back of the kit towards the front gives a much better representation of the entire kit without having to overcome the placement of the cymbals.
Things to keep in mind:
a. The drummer needs to be consistent in how he/she plays.
b. Make sure the condenser is high enough so that it can capture the entire audio "image" of the kit but not so high where the drum set loses its sonic impact!
c. Remind the drummer where the boom stand is so that it doesn’t get knocked over.
d. Make sure the microphone isn't pointing towards the drummer's head (if they have in-ears); if a stage wedge is used for monitoring, make sure the it isn't firing into the overhead mic!
"What Microphones Do You Recommend? Because We Don't Have A Lot Of Money"
I'm going to list some inexpensive microphones as suggestions. All prices are as if you bought them new. Remember, you can purchase used microphones for usually half of the price of new ones!
Here are some great budget-friendly options (with prices) for decent kick drum microphones:
Sennheiser e902 - $199.95
Shure Beta 91 (you don't even need a stand for this one) - $239
Audio Technica ATM250 - $179 (this model replaced the ATM25 which was a great kick mic).
Peavey 520i (yes I said the "P" word, but it's a killer kick drum mic) - Used Market. Price Varies.
Shure Beta52 - $189
EV RE320 - $299 (more expensive option, but well respected for multiple sources).
There's a ton of other great choices from companies such as Audix, Heil, AKG, etc.
Here are some great budget-friendly options (with prices) for condenser microphones as well:
Audio Technica Pro37 - $169 (this mic is incredibly good for just about any source)
Shure KSM27 - $299 (although I saw one in decent condition at Guitar Center, used, for $139).
Audio Technica 3035 - No longer made, but you can find it for a song on the used market.
Audio Technica 2020 - $99 Cheapo with decent results that came after the 3035.
sE Electronics X1 - $199 great mic for the money with some surprising results.
CAD m179 - $199 Well respected budget-friendly microphone that's very versatile.
ORTF, Recorderman, Baffled Omni Pair, & Blumlein are also great methods as well, but will require extra equipment, or constant maintenance to maintain mic positioning. Recording—yes, much easier, but a situation where you have various people running around, and usually in the tight confines of a drum isolation booth or stage, not so much. I have seen, though, where people have a permanent rig mounted on the ceiling of a drum booth to accommodate ORTF and/or X-Y with a stereo bar.
When miking a drum set overhead, it is important to get a sonic "picture" of the entire set. Make sure you have enough space overhead (if possible) to get the microphones high enough to give a good representation of the entire kit. Don't get too high with them on a live stage, though. You want more drums than you do ambient stage sounds. Also, most of the time, you will need two condenser microphones to achieve a good sonic picture. If all you have is one condenser microphone, you can place that mic about 2-3ft above the drummer's right shoulder pointing towards the toms. This effectively centers the mic to the center of the entire set (from kick to cymbals).
Great Overhead Drum Microphones
- Audio Technica Pro37 - A lot of Bang for the Buck. Inexpensive, but great.
- Neumann KM84 / KM184 - Expensive, but great quality
- Rode NT5 - Nice quality. Great performance.
- Rode NT4 - Pre-configured in x-y
- Shure KSM-27 - a lot of engineers swear by these for drum OH
- Shure SM-81 - a studio standard for overheads
- AKG c451 - a classic all-arounder condenser
- Sennheiser e614 - great performance, decent price
- CAD m179 - one of the cheapest, but a great performer
- Studio Projects LSM - newer to the bunch. Extended lows.
- Shure PG-42 - cheap bang for the buck
- AKG 414 - expensive, but rather lovely for just about anything!
- DPA 2011c - beautiful sounding microphone. Upper-end of the scale.
The following video is more for recording than live work, but I wanted to include it none the less.
**Cool Recording Tip Alert: After recording your drums with room mics, you can zoom in on your wavs in your DAW and click-drag your room mic wav files to align with your overhead microphones. This will lessen any weird phase issues you may have but still keep the room sound and will inevitably fatten your drum sound without phase issues!
**Cool Recording Tip Alert: After recording your drums with room mics, you can zoom in on your wavs in your DAW and click-drag your room mic wav files to align with your overhead microphones. This will lessen any weird phase issues you may have but still keep the room sound and will inevitably fatten your drum sound without phase issues!
Bass Guitar
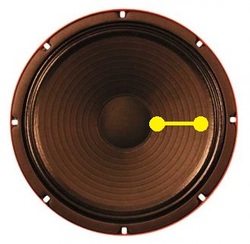
Most of the time, bass guitar goes direct, but some bassists prefer for their bass cabinets to be miked as well. This is most commonly achieved with a dynamic microphone that is especially designed for capturing low end, but here are some bass cabinet microphones that excel above the others. The Audio Technica ATM-25 is one of those; this would be my first pick. It's affordable, and really shines for this purpose. The Peavey PVM 520i is another great bass cab microphone, and the Shure Beta 52 is popular among bassists as well. The best place to start when miking a bass cabinet speaker is the area between the dust cap (the round thing in the middle of the speaker) and the edge of the speaker. Some folks like to mic a speaker where the edge of the dust cap meets the main cone. Let your ears be your guide. Once you mic the bass cab, blend it with a direct signal from the bass (which would come from a direct box or preamp of some sort). Check out our section on direct boxes for our suggestions on what to use for bass. The SansAmp Bass Driver DI is a good start, or just a simple direct box like the inexpensive Whirlwind IMP will do as well.
Most of the time, bass guitar goes direct, but some bassists prefer for their bass cabinets to be miked as well. This is most commonly achieved with a dynamic microphone that is especially designed for capturing low end, but here are some bass cabinet microphones that excel above the others. The Audio Technica ATM-25 is one of those; this would be my first pick. It's affordable, and really shines for this purpose. The Peavey PVM 520i is another great bass cab microphone, and the Shure Beta 52 is popular among bassists as well. The best place to start when miking a bass cabinet speaker is the area between the dust cap (the round thing in the middle of the speaker) and the edge of the speaker. Some folks like to mic a speaker where the edge of the dust cap meets the main cone. Let your ears be your guide. Once you mic the bass cab, blend it with a direct signal from the bass (which would come from a direct box or preamp of some sort). Check out our section on direct boxes for our suggestions on what to use for bass. The SansAmp Bass Driver DI is a good start, or just a simple direct box like the inexpensive Whirlwind IMP will do as well.
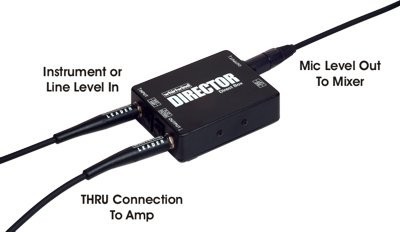
The picture to the left demonstrates the method of sending the bass guitar signal to the mixing console and amplifier at the same time. One 1/4" connector goes into the direct box from the bass, and the other 1/4" connector goes to the amp. The XLR (mic cable) goes to the snake, which sends its signal to the house. This combined with miking the bass cabinet makes for a huge bass sound with a lot of versatility and options for the live sound engineer! Be aware, though, that it will take two channels on the snake, and if you don't have two channels available, it would be better to go direct (like the picture on the left shows).
Electric Guitar
|
|
To mic an electric guitar cab effectively, ask a few questions:
Answering these questions will help determine what type of microphone to use and its optimal placement. If you are on a loud stage with another guitar amplifier or bass cabinet blaring beside you, you may want to consider using a microphone that is very directional and features quite a bit of side rejection. This is one of a few reasons why the Shure SM-57 is so popular. As a microphone on a live stage, it's very directional, thus rejecting other sounds around it, and offers a slight bump in the 5 Khz region. One of my favorites for electric guitar is the Shure SM-7. This is a beauty of a microphone for electric guitar! If you are miking your guitar amp cabinet in an isolation room (this is what my church has), and the other amplifiers are separated acoustically, you could go with a ribbon microphone with a "rounder" tone (no phantom power allowed on most of these, unless it is a Royer or similar), or a condenser microphone for more of an open, "airy" sound. For more information on this, check out our section on the different types of microphones and what they do. Let's break it down Most of the time, someone will just throw a microphone in front of a speaker and then just EQ it, but this can be the equivalent of putting lipstick on a pig. Change the tone at the source first by simple microphone adjustments; your mixes will thank you later.
|
Piano
Some people are very intimidated by the notion of miking a piano, but it doesn't have to be that hard.
If it is an upright, you can use a boundary microphone in the middle of the top lid pointing towards the strings. Have the pianist play, and if you need more of the high strings, move it a little towards the high strings; if you need more of the bass side, move it towards the bass side. Boundary microphones under the lip in uprights work great for loud stages because there is some separation there. Obviously if there is only a piano and an organ, you'll have more options available to you, like a standard condenser microphone pointed in the piano with the lid open. I have even seen the whole top of the piano front removed, exposing the strings in live concerts where they are using in-ear monitoring. Your particular situation may vary wildly from someone else’s.
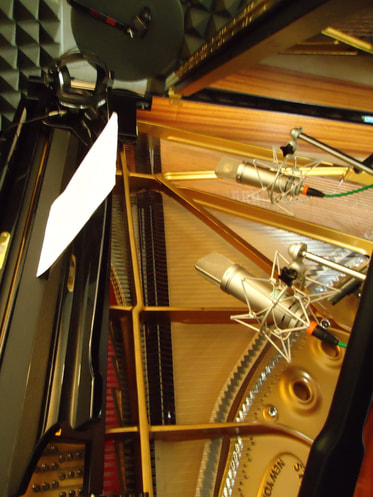
If it is a Grand or a Baby Grand piano, you can have more of a challenge, but remember that your ears are your guide! If you are playing this type of piano on a loud stage, feel free to use a cardioid dynamic microphone. Even though condenser microphones are more popular in miking a piano, I have seen and used dynamic microphones to great effect; this can especially be ideal around loud guitar amps and such because they are not as sensitive and can reject sounds not directly in front of them. With that said, keep in mind that you really want to capture the entire sonic picture of a piano. They are one of the most dynamic and wide-ranging instruments in the world with regard to frequency spectrum; this is primarily because of the frequency spectrum they can occupy and the fact that a piano is actually a percussion instrument! If you have a really quiet stage, then feel free to have the lid open as there is nothing wrong with the piano's natural sound leaking into the room; this is ideal, but you can also use microphones to accentuate and fill in any voids the audience may perceive because of the room.
As far as microphone choices:
A pair of Oktava Mk-012's (condenser microphones) would be a great choice for piano, or a pair of Audio Technica AT4041's or 4051's. The AKG 414 is a wonderful sounding microphone for piano as well. If you don't have a lot of money, the Audio Technica Pro37r is really good. Nothing wrong with boundary microphones, either. Just remember that whatever you use, make sure you have an equality between the bass and treble sections of the piano and that all of the aspects of the piano's sound are well represented.
Acoustic Guitar
Sometimes (if not most of the time) simplicity is the best method in sound reproduction, especially in church environments. Here's how to apply that in placing a microphone on an acoustic guitar:
Don't mic the sound hole. Most of the time, it's gonna be too boomy unless it is a very small parlor-sized guitar.
In a live situation, choose one decent condenser microphone, and start by placing the mic at the 12th fret on the fretboard of the instrument. Move the microphone from there to the upper bout near where the neck connects to the body, either above or below the neck. Adjust to taste: move the guitar or mic a little at a time until the sweetest sound emerges. Remember where this spot is, and try to stay there. This is easier with an in-ear monitoring system because you can hear the tone of your instrument directly.
Mics to use: Audio Technica Pro37, AT4041, Rode NT5 or M3, Crown CM700, Oktava MK-012, Audio Technica 4033, Shure SM81, Audio Technica 2035 (budget mic), Shure SM-81, Sennheiser e614, etc, etc, etc.
Not all environments in a live worship scenario are conducive to miking an acoustic guitar. Most of the time, a direct signal is used from a pickup installed in the instrument and sent to an acoustic preamp/direct box. Click here to see our recommendations for acoustic guitar preamps. Fishman, L.R. Baggs, and a host of other companies manufacture pickups for acoustic guitars. I myself use the L.R. Baggs I-Beam (Passive Version) pickup with a Fishman preamp, and I am very happy.
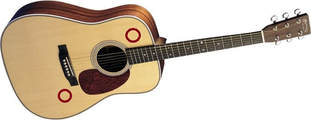
When recording acoustic guitar in a studio situation, you typically have many options to achieve a great tone (as long as the instrument already has a good tone). Stereo close-miking an acoustic guitar can often yield great results in capturing the entire instrument; then panning both channels wide and opposite from one another can open a "hole" in the middle of the stereo spectrum for the vocal to sit in. Wearing a pair of good headphones and muting one mic while adjusting the other for the best tone is very helpful. I like to start pointing one mic near the upper bout near the top of the neck while the other microphone is pointed at the lower "point" of the bridge. Adjust each to taste separately. The two points as shown in the diagram are good starting points. Make sure you are only listening to one microphone at a time. Move the mic where it sounds the best. Memorize where the location is, and then move to the next mic. Adjust it the same way. As a note, it's a good idea NOT to mic the soundhole of an acoustic guitar. It's usually too boomy in that position.
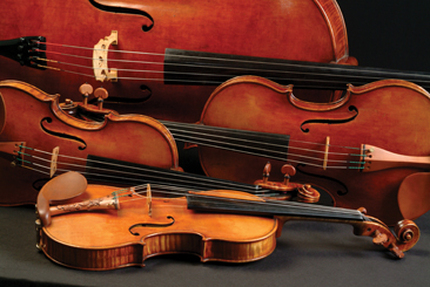
Strings
There are no rigid rules in placing a microphone on any particular instrument, but there are better ideas than others. When putting a microphone on a stringed instrument, here are a few things to keep in mind:
Violins / Violas - Try a dynamic microphone rather than a condenser microphone for smaller-bodied bowed instruments. Most of the time, smaller-bowed instruments can come across as too strident with a condenser microphone. Instead, try a dynamic cardioid—something boring and unpredictable, like a Shure SM-58 or an SM-7b. Don't knock it till you try it! Place the microphone facing down on a boom stand pointing at the top of the violin. Make sure the microphone is secure, because God forbid it should fall out of its clip and hit the instrument. Electrical tape would be advisable to keep the mic in its place. A lot of times you can get a great rich tone by pointing the mic at one of the f holes. Let your ears be the guide.
These are some great microphones for violin if you have the budget: Shure SM-7, Sennheiser MD-421 or MD-441, or the Stedman n90 to name a few. Ribbon microphones can be very effective at taming the high-end shrillness of violin as well: Cascade, RCA, Royer, Beyerdynamic, Coles, Shure, and a host of others build ribbons. If the violin/viola is being used on a loud stage, there are manufacturers that make bridges with built-in pickups.
Cello, Double Bass (upright) - For larger stringed instruments, small-diaphragm condenser microphones are very effective. Place your ear next to the instrument as it is being played, and try to find the sweet spot (the best and richest sounding area of the instrument). A good place to start (especially for an upright/double bass) is on the treble string side of the instrument; then work from there, staying on the same side. This is not a strict rule, just a general guideline. Once you find the best place, remind the musician to try and keep the microphone pointed at that area of the instrument when playing.
Leslie Cabinet
If you have never miked a Leslie cabinet, it may be intimidating at first, but it's actually rather simple. Check out the diagram below:
If you have never miked a Leslie cabinet, it may be intimidating at first, but it's actually rather simple. Check out the diagram below:
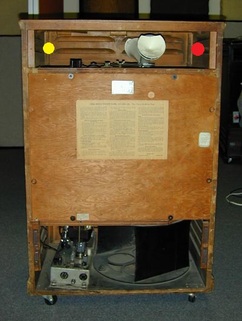
Get a boom stand and a dynamic microphone. A Shure SM-57 will work fine, or if you'd like something more expensive, like a Shure SM-7(b), that would be great too. Place the microphone where you see the yellow dot in the picture to the left. If you want to stereo mic it, place another matching microphone at the red dot as well. Then angle the microphone straight, not towards the spinning wonder of happiness (the horns). It doesn't have to go deep in the cabinet; just mic it where the capsule of the microphone is even with the edge of the cabinet. Then, listen. Make sure you have no wind noise going on because the spinning horns can do that. Don't worry about miking the lower rotor as it is usually not miked anyway; you can if you want the extra low end, but it is not necessary. One thing to keep in mind with a Leslie is that only one horn is actually putting out sound; the other is a dummy just for weight distribution. Don't get the microphone too close to the horns because the last thing you want to do is for the horns to smack your microphone and get ruined in the process. They are expensive, and I have heard some really rough stories (like the horn getting stuck with the microphone and the belt or motor burning up).
Brass
Bring back the brass section! Music nowadays is missing it!
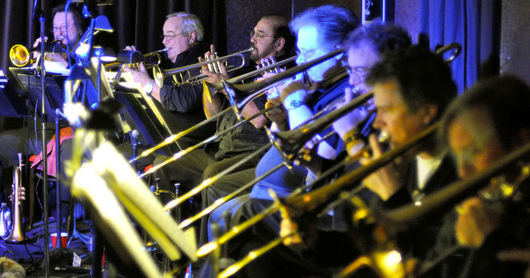
Sometimes simplicity can really be great here. There is nothing wrong with placing one microphone in the middle of a small section and all of them pointing their instruments towards it. This saves on console channels (if that is an issue) and microphones. As long as your brass players have been playing together for a while and can balance their own volumes, I'd say go for it. However, if you have the channels and the mics to mic each person, that would be preferable because you'll have more control over each instrument.
Dynamic and Ribbon microphones are the most appropriate mics for brass. Brass really isn't picky. You can mic them with just about anything that can handle the high db's and be fine. I played trumpet for 20 years and have found this to be true, especially if you have a competent engineer at FOH.
Here are some favorites for brass:
Sennheiser Md-421
Sennheiser Md-441 ( $ )
Electro-Voice N/D468
Shure SM7b
Royer R-121, 122
Audio Technica Pro25ax
If all you have are SM-57's and/or 58's, they work fine as well. With the bump in the 5khz area, your brass section will certainly cut through the mix.
So, why not condensers? Well, why not! This really depends on the voicing of the band. Condenser microphones can be fine for brass, but I have found that they can sometimes be a little bright; this is all totally subjective as you know. If you have a dude rockin' a Flugel, a condenser could be the ticket. Stage volume is also something to consider when choosing microphones for brass.
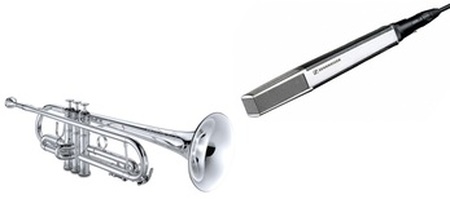
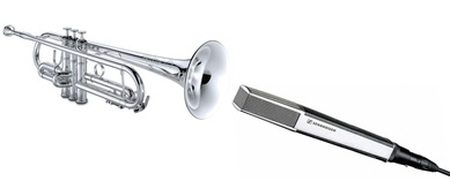
Now as far as placement, if you mic the actual side of the bell (Off-Axis) of the instrument, you'll have a darker and rounder tone. If you mic the middle of the bell of the instrument (On-Axis), you'll typically have a brighter and more airy tone. Some guys (like on trumpet) will mic the bell until they have to rip a solo, and then move their instrument where the middle of the bell is facing the microphone to cut through a busy mix.
