GAIN STRUCTURE
**Disclaimer: Yes I know you probably have a digital console. I am teaching this material from an analog perspective so that there will be a common denominator as to the functionality of audio device controls, their connections, and their general use. Every digital console can be radically different as to which menu/screen a certain function can be located. My goal is to teach these concepts in a very concise and easy to understand manner without being bogged down with each manufacturer's menu preference. "On a Yamaha Rivage, this can be found.... On a Behringer X32, this can be found...."
One of the simplest things to get right and simultaneously one of the most overlooked facets of live sound and recording is gain structure.
If your sound system:
Here are some guidelines; we will deal with each part of a sound system separately and in order:
Musician's Instruments, Microphones, and Other Gear
If your sound system:
- has multiple channels showing up in the red,
- sounds "crunchy" or distorted,
- keeps blowing speakers, or
- has any number of sound issues,
Here are some guidelines; we will deal with each part of a sound system separately and in order:
Musician's Instruments, Microphones, and Other Gear
- Keyboards, Drum Machines, etc. - Most of the time, if you put the volume knob or fader of a given keyboard in the 3/4 position, this will leave you with plenty of travel in either direction; this means that you can turn it down or turn it up easily with plenty of headroom.
- Bass Guitar Amplifier - A lot of bass amps now have a direct out with a volume control on the back of the amp to determine the amount of signal it is sending out to the house. It's like a built-in direct box for basses. If the amp is sending out way too much signal through this direct out, check to see the position of the knob (if it has one) to make sure it is not turned up all the way. Start at the halfway point of the knob's travel, and then adjust from there. If the amp doesn't have a direct out, you may have to plug the bass guitar directly into a direct box in the input of DI, and then plug the output of the DI into the bass amp. The XLR would then run out to the house through the snake.
- Kick & Snare Drum Microphones - Most of the time, a good kick and/or snare drum microphone will put out a lot of signal. If this is the case, you can either put in an in-line PAD like this one, or you can push in the PAD button on your console (if it has one) to tame the loudness of the signal so that you can get a reasonable level coming into the console's channel without clipping.

The Mixing Console
In the big picture of gain structure, the primary integral component is the mixing console. Too often an engineer has almost every channel clipping and wonders why the sound is so terrible. What follows is the best method for setting the ideal gain level for your mixing console; it will make a huge difference in the overall sound of your music.
The Best Method: Have the whole band play a song. From the drums all the way up the instrument list, set the gain of each channel one at a time.
Here's a tip: Keep in mind that a band will almost always perform at a level louder than what they soundcheck.
In the big picture of gain structure, the primary integral component is the mixing console. Too often an engineer has almost every channel clipping and wonders why the sound is so terrible. What follows is the best method for setting the ideal gain level for your mixing console; it will make a huge difference in the overall sound of your music.
The Best Method: Have the whole band play a song. From the drums all the way up the instrument list, set the gain of each channel one at a time.
- Press the PFL button for what channel you want to set the appropriate gain for. Make sure that only one channel at a time has its PFL button pressed.
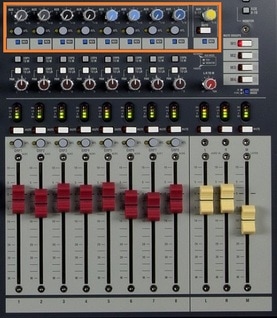
- Now look at the master section of the mixer. You will notice a row of LEDs as shown in the orange rectangle to the right (on an analog console). On a digital console, you'll see the channel gain on screen or on the channel itself.
- Starting from its lowest position, adjust the gain/trim control upward until the loudest parts of the signal you are adjusting peaks at zero (this is for analog consoles only). Or, -18db for digital consoles.
- Once the level is peaking at zero (analog consoles) or -18db (digital consoles), depress the PFL button on the channel you just adjusted. **Attention: Most of you by now are on digital consoles. 0db on a digital console IS clipping! On a digital console, set the gain on each channel where the instrument's signal is peaking at around -18db.
- Move to the next channel, and repeat the process until every active channel's gain has been set. It's ok on an analog mixing console if you have an occasional peak here and there. Don't be too OCD about it. Occasional peaking on a kick drum and snare is common.
Here's a tip: Keep in mind that a band will almost always perform at a level louder than what they soundcheck.
Once you have completed the above process for every channel, you have essentially set each instrument to be the same volume across the whole console, which will make the gig a lot easier to mix.
Once you have completed the above process for every channel, you have essentially set each instrument to be the same volume across the whole console, which will make the gig a lot easier to mix.
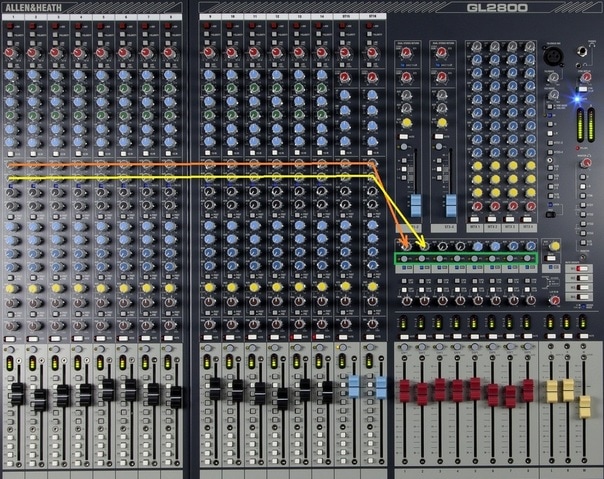
 All of the aux 1's are routed to the aux 1 main volume knob.
The Auxiliary Section
It is important to set the auxiliary main volume controls, found in the master section of the console, to the appropriate level. This is accomplished in much the same manner as described in the previous section, but keep in mind the signal flow as it happens here.
For instance: All of the auxiliary 1's (the orange line) on every channel are routed through the auxiliary main knob #1 pictured in orange rectangle to the far right. This control is basically the main volume of all of the aux 1's. The same can be said for Aux main 2, and so on and so forth. Look at this diagram below as an example:
 Pictured in the orange rectangle are the auxiliary main volume knobs.
Let's say that you run monitors on some of your auxes. Those levels can change at any time because, depending on each musician’s need at the time, monitor mixes can be very fickle. The best thing to do is to keep it simple:
- Put each Aux main knob anywhere from the middle position to 3/4 of the way (Marked Unity on most consoles)
- Set the appropriate monitor level for each musician as they need using the auxes on each individual channel.
- Press the AFL button of the main auxiliary you'd like to check just to make sure you are not clipping on the main VU LED meters (as shown in figure 1 in the previous section). When doing this, make sure all PFL's and other AFL's are off except the one you are tweaking.
- Adjust the aux main knob to where it is peaking at "0"
Amplifiers
Many people are confused about the two knobs on the front panel of power amplifiers.
They do not control output volume but rather input sensitivity.
To adjust them correctly:
Once you are satisfied that it has been set correctly, move on to the next channel on your amplifier(s). Remember that your console is providing the signal to your amplifiers when doing this. I would suggest placing the Main Volume faders on your mixing console to "0" before setting up the input sensitivity on your amps.
Many people are confused about the two knobs on the front panel of power amplifiers.
They do not control output volume but rather input sensitivity.
To adjust them correctly:
- First start with the control at its lowest point.
- Then, as the full band is playing in a loud section, turn up the control until the peaks of the music are just barely clipping (blinking red). Then turn it down one notch - or 2 notches for a little extra headroom.
- Watch it from there to make sure that it's not clipping anymore when the band is at their loudest.
Once you are satisfied that it has been set correctly, move on to the next channel on your amplifier(s). Remember that your console is providing the signal to your amplifiers when doing this. I would suggest placing the Main Volume faders on your mixing console to "0" before setting up the input sensitivity on your amps.
Outboard Processing / Rack Effects
Let's say that you have a reverb or multi-effects unit in your rack. It is important to set the correct gain so as to not allow any clipping within the unit. For example, say that the effects unit resides on Aux 4 and is routed back into a channel on the mixing console. Simply look at the meter on the effects unit and make sure that whatever you are sending to it doesn't clip once it gets into the box. You'll want to look for something like this:
Let's say that you have a reverb or multi-effects unit in your rack. It is important to set the correct gain so as to not allow any clipping within the unit. For example, say that the effects unit resides on Aux 4 and is routed back into a channel on the mixing console. Simply look at the meter on the effects unit and make sure that whatever you are sending to it doesn't clip once it gets into the box. You'll want to look for something like this:
Now, do you see the meter on the screen outlined with a blue rectangle? That (or something similar) is what to look for. Make sure that the signal doesn't go into the red or you'll likely get some nasty clipping artifacts. Keep in mind that 0 db in the digital realm is considered clipping; on the analog side, it is not. Analog clipping is more forgiving than digital clipping. If it is clipping, or if conversely you don't have enough signal going to the unit, reach for the Input Level knob on the effects processor and adjust it until you see the signal on the meter reach about 1/2 to 3/4 of the way with no signal peaks clipping.
Quick Note: Again, "0" db in the analog realm is NOT clipping. "0" db in the digital realm IS clipping. Analog clipping can sound pleasing to the ear whereas digital clipping sounds terrible.
|
|


